[Solution]: How to fix “Windows Was Unable to Complete the Format” error?
-
Written By Sapna Trivedi
-
 Updated on November 26, 2020
 -
 Min Reading 5 Min
 - Share

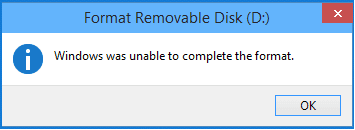
The error Windows was unable to complete the format pops-up when you right-click a drive to format, but Windows couldn’t format it. As soon as you click on Format, Windows tries to get the information about the partition, file system, any additional configuration such as write-protection, and the other inputs that it needs to format the drive. The error comes with the following cases:
- Case 1 – Windows cannot complete format on USB
- Case 2- Windows was unable to complete the format on the SD card
<fig: Windows was unable to complete the format>
It performs various sub-tasks such as erasing the partition to format the drive after getting the required information. If it couldn’t retrieve the required information or complete the sub-tasks, it fails to complete the format. There could be various reasons of Windows was unable to complete the format. Some of them are below:
Top causes—Windows Was Unable to Complete the Format
- Write protection is enabled.
- Bad sectors on the drive.
- Due to physically damaged.
- Virus attack deleted system files.
- The drive has turned RAW – file system is corrupt.
- The drive isn’t formatted with Windows supported file systems such as FAT(FAT16/FAT32), exFAT, or NTFS.
Before we talk about the ways to fix the ‘Windows was unable to complete the format’ error, it’s important to know that formatting leads to data loss. Moreover, multiple attempts to do this may lead to permanent data loss.
[Caution]: If you have a backup of the drive you want to format, you are good to try the steps mentioned in this blog. However, if not, you must reach out to a Professional Data Recovery Service provider in the first place to avoid permanent data loss.
Ways to fix Windows Was Unable to Complete the Format error
There are multiple ways to get rid of the error Windows was unable to complete the format, which is mentioned below. Follow the instructions step-by-step:
Step#1: Scan for malware/viruses using an anti-malware
Malware infects the system files due to which you may not be able to format the drive. Run Windows Defender or any other third-party anti-malware to scan the drive and quarantine the malware if any.
Step#2: Disable Write-Protection
If the registry key called “WriteProtect” is enabled, you’ll be unable to format the drive and might get the error Windows was unable to complete the format. To disable, set its value to 0 (zero). You can do it, as follows:
- Press Windows+R and type Regedit.
- Click on OK.
- Provide admin credentials, if prompted.
- Go to HKEY_LOCAL_MACHINE >SYSTEM >CurrentControlSet >Control.

- Select StorageDevicePolicies.
If you couldn’t see StorageDevicePolicies, create one by right-clicking on the Control folder, select New>Key and name the key as StorageDevicePolicies.
- Double-click on WriteProtect and change Value data to 0.
If you couldn’t see WriteProtect in the StorageDevicePolicies folder, right-click on StorageDevicePolicies and select the New>Dword (32-bit) value and name it as WriteProtect. Double-click on it and change value data to 0.
- Remove your drive safely after closing the Registry Editor.
- Reconnect the drive and try to format it again.
Step#3: Run the CHKDSK command from the command prompt.
CHKDSK is a command that can fix drive corruption, repair damaged file system, and retrieve data from bad sectors. You can run this command to fix Windows Was Unable to Complete the Format error as given under:
- Launch a command prompt as an admin.
- Type chkdsk /f /r h: (h is the drive letter.)
- Hit Enter.
- Let the command execute completely.
- Try to format the drive.
NOTE: This command would only work with NTFS formatted drives.
Step#4: Use Disk Management
Instead of using File Explorer to format the drive, use the Windows Disk Management Tool. You can do it, as follows:
- Keep the Windows key pressed and simultaneously press the X key.
- Click Disk Management.
- Right-click on the affected drive and click (Click on New Simple Volume if you couldn’t see the Format option or if it’s disabled).
- Provide a Volume Label (optional), and select a File System.
- Click OK for the prompts that follow.
Step#5: Use DiskPart command
You can run diskpart from the command prompt to perform any task related to Disk Management. You can get a list of all the disks connected to your system, select the disk, and format the selected disk. Here’s how you can do it:
- Launch a command prompt as an admin.
- Type diskpart and hit Enter.
- Type list disk and hit This will enlist all the connected disks with their respective disk number. An example of the list is given below: a) Disk 0 b) Disk 1 c) Disk 2.
- Type select disk followed by the disk number of the disk you want to format. For example, select disk 1.
Make sure that you don’t make a mistake while selecting the disk as the next command will take action on the selected disk.
- Type clean and hit Enter. This will erase all the data on the selected disk.
Note: Until this step, we’ve just erased the existing partition and formatting from the disk, but haven’t formatted it yet.
- Type create part pri and hit Enter to create a primary partition on the disk.
- Then, type active and hit Enter to mark the partition as active.
- Type format FS=fat32 label=Pendrive quick and hit Enter. This will format your drive.
Where:
fat32 is the file system I want my drive to be formatted with. Likewise, you can enter any other file system such as NTFS for your drive.
Pendrive is the label that I gave to my drive. You can choose any other name of your choice.
- To assign a drive letter, type assign letter=Y, and hit Enter.
Y is the letter that I’ve assigned. You can choose any other letter.
- Lastly, type exit and hit Enter.
If you are able to format the drive and hence have deleted your data, you can still get it back from the formatted drive. The Data Recovery Experts can do that for you even in the case of severe corruption or physical damage. It’s best that you handover your drive to them for data recovery before losing hope and trying to format the drive.
You can leave your comments in the “Leave a Reply” section for your queries or feedback.
Conclusion
In this blog, we talked about formatting a drive that throws the error “Windows was unable to complete the format” while trying to format. We discussed the reasons and solutions for this error. We also got to know the negatives of random attempts to format the drive.
It’s important to take regular backup of the data so that you don’t have to think before formatting the drive. Getting the help of a Professional Data Recovery Service provider before formatting or even after formatting is the best choice as they understand your needs and the importance of your data.
About The Author

Sapna Trivedi is a Sr. Online Marketing Executive at Stellar. She has more than 5 years' of experience in the data recovery industry. Specifically, she has knowledge of data recovery services, photo recovery software, and SQL Repair software. She has always been a learner and she loves to implement her technical & marketing skills in her professional career. She has been successful in creating a blend of her hard skills and soft skills and utilize it effectively in her domain area of expertise.