Macs are known for their reliability, but even the best systems aren’t fully immune to hard drive corruption. Whether your Mac hard drive is corrupted because of sudden power failure, file system errors, or a failing drive, the result is the same—you can’t access your files, mount your volumes, or, in the worst case, your Mac refuses to even boot properly.
If you suspect your Mac’s hard drive is corrupted, don’t panic just yet. There are reliable ways to get your data back. And no, you don’t need to be a tech expert to use them!
While macOS does provide a few built-in repair options, they may not always work, particularly if the hard disk is severely corrupted. And that’s where professional-grade recovery tools like Stellar Data Recovery for Mac come in.
In this article, we’re going to show you exactly how to recognize a corrupted Mac HDD, what you should (and shouldn’t) do, and how to recover your lost files.
Signs That Your Mac Drive Is Corrupted
If you know the early warning signs of corruption, you can take quick action before things get worse. Here are the most common symptoms that your Mac Drive is corrupted.
⚠️ Disk Utility fails to repair your drive: If First Aid gives you errors like “The volume could not be repaired,” your drive may be seriously damaged or corrupted.
? Your Mac takes unusually long to boot or freezes during startup: This is often caused due to directory structure corruption and may point to bad sectors in your Mac’s hard drive.
? Your folders appear empty or files are missing: If you’re suddenly losing files or some folders become inaccessible, there’s a good chance that your Mac device is suffering from logical corruption.
? You get “The disk you inserted is not readable by this computer” error: This error usually shows up when you try to access an external drive that is corrupted.
❗ Your drive won’t mount in Finder or Disk Utility: If the macOS system can’t recognize or mount the volume, it’s likely corrupted.
? You are facing repeated system crashes or kernel panics: Frequent crashes may stem from disk-level inconsistencies or bad sectors, which point to corruption.
Try the Built-In macOS Utilities to Fix Drive Corruption
Before you jump to third-party tools, macOS’s native utilities might help fix some minor corruption, so let’s try them out first. Apple provides several built-in tools that can detect and fix basic file system errors on your Mac, especially if the corruption isn’t too severe. Here are three we found that work best.
1. Run Disk Utility > First Aid
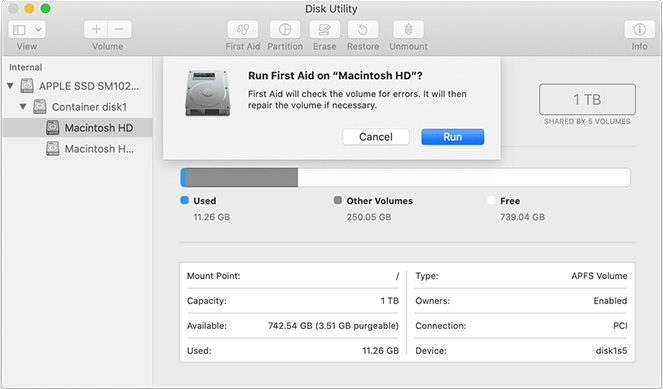
Your macOS has an app called Disk Utility, which comes with a tool called First Aid. This tool attempts to check and repair file system issues on your Mac drive. Here’s how to use it.
- Go to Applications > Utilities > Disk Utility.
- Select your corrupted disk or partition from the sidebar.
- Now click First Aid > Run.

- Wait for the process to complete, which can take somewhere between a few minutes and an hour, depending on the size of your drive. If any issues are found, they’ll be automatically fixed.
- Once the tool finishes its scans and repairs, try accessing your data again.
Note: If First Aid fails with a “cannot repair” message, you’ll need to use advanced recovery methods. We’ve discussed them in detail in the sections below.
2. Use Terminal > FSCK in Single-User Mode
FSCK (File System Consistency Check) is a macOS command-line tool that scans and repairs file system errors on your drive. Here’s how to use it.
- Restart your Mac and hold Command + S during the boot sequence. This will let you boot into macOS in Single-User Mode.
- At the prompt that appears, type fsck -fy and press Enter.
- Wait for the check to finish. If it says “File system was modified,” run the command a few more times until you see the message, “The volume appears to be OK.”
- Type reboot and press Enter to restart your system normally.
Note: FSCK works only with HFS/HFS+ formatted drives. If your drive is formatted with the APFS file system, this method won’t work.
3. Try Safe Mode
Sometimes all you need to do is boot into Safe Mode. This can help you access your corrupted drive for further repair or backup. Here’s how to go about it.
- Shut down your Mac.
- Power it on and immediately hold Shift.
- Release Shift when you see the login window.
- Once it boots up, check if you can access your files. If you can, immediately back up your files to a healthy drive.
If none of these built-in solutions work, and the data at stake is crucial, you should consider seeking professional support.
Stellar Data Recovery for Mac: Trusted Choice for Corrupted Drive Recovery
If macOS’s built-in tools fail to repair your corrupted drive or recover lost data, Stellar Data Recovery for Mac offers a much more advanced and reliable solution. Whether your Mac drive is formatted, unmountable, encrypted, or severely corrupted, Stellar’s tool provides a safe and professional-grade way to restore your data, all from the comfort of your home.
But Why Use Stellar Data Recovery for Mac?
For starters, Stellar Data Recovery for Mac is a trusted recovery solution built specifically for Apple systems. It offers:
✅ Support for All Your macOS File Systems: APFS, HFS+, exFAT, and FAT32 support
✅ Encrypted Drive Recovery: Lets you recover data from FileVault-enabled or password-protected volumes
✅ Custom Recovery Modes: Lets you choose between Quick and Deep Scans depending on the severity of corruption
✅ Non-Destructive Recovery: The software never writes to the corrupted source drive
✅ File Preview Before Recovery: Lets you know what you’re recovering—photos, videos, documents, and more
How to Recover Files From a Corrupted Mac Hard Drive Using Stellar Data Recovery for Mac
- Download and install Stellar Data Recovery for Mac from the official website. Open the app once you finish installation.
- You can now choose the file types you want to recover (this could include Documents, Photos, Videos, Audio, Emails, etc., or simply select “Recover Everything” if you aren’t sure).
- Next, from the list of available volumes, select your corrupted Mac drive that you want to scan. If the drive is not listed, check that it’s connected properly; else, check Disk Utility.
- You can now start a Quick Scan. If no files are found or the corruption is too severe, tick the Deep Scan mode and scan again for a more comprehensive search.
- Once the scan completes, you can browse through the recovered files using the software’s Preview feature. This will help you verify that your recoverable data is intact and is what you’re actually looking for!
- Now all you have to do is to select the files you want to recover and save them to a different, healthy storage drive. Never save to the corrupted source to avoid overwriting data and preventing data loss!
If the drive has failed and you can’t boot into macOS:
It is possible that your drive is extensively corrupted and failing. In that case, you will not be able to boot into macOS. However, you can still run Stellar Data Recovery for Mac on your system and recover data by using the Recovery Mode. However, this can be challenging for some users as attempting this requires some technical know-how. You should immediately contact Stellar’s Mac recovery experts—they will guide you through the process.
Preventive Tips to Avoid Future Corruption
Stellar Data Recovery for Mac can help you recover your lost data, but we know that prevention is always better than a cure. Follow these best practices to reduce your risk of drive corruption and data loss.
? Maintain Regular Backups: You can use Time Machine on your Mac or any other trusted cloud storage service to create automatic backups of your important files. This lets you restore data even if your Mac’s drive fails completely.
⚡ Always Eject Drives Safely: Avoid unplugging your external drives or USBs without properly ejecting them via Finder. Any sudden disconnections can potentially damage your file system’s integrity and cause corruption.
? Use a UPS or Stable Power Supply: Power outages and surges can interrupt read/write operations and cause corruption on your Mac. Investing in a good UPS can help maintain power stability for your desktop devices.
? Avoid Overfilling Your Drive: As a rule of thumb, you should keep at least 15-20% of your Mac HDD’s storage free. Low disk space will lead to fragmented files and then cause instability on your system.
?️ Run Disk Utility Regularly: Like we showed you above, you can use Disk Utility > First Aid to check and repair minor disk errors before they escalate into serious corruption.
? Update macOS and Apps: This one is perhaps the easiest precaution to take; make sure that your system and software are always up to date. This simple step can prevent compatibility-related file system errors on your Mac storage drive.
? Be Cautious With Third-Party Tools: Only install apps from sources you trust. Any poorly designed utilities that can overwrite or corrupt critical file system structures on your Mac should be avoided.
Final Verdict
Corrupted Mac hard drives can be troublesome, but they will eventually result in data loss. To fix corrupted Mac hard drives and recover data, try using Apple’s native recovery utilities.
If they don’t work, try using Stellar Data Recovery, which is not only robust at what it does but also lets you recover up to 1 GB free of charge. Its easy-to-use interface can be used by both professionals and beginners alike. But if your specific data loss scenario involves severe corruption, don’t hesitate to reach out to our experts at Stellar for data recovery from MacBook and other Apple devices.
Related Mac Topics You May Find Helpful:
FAQs
1. Can I recover data from an unmountable Mac hard drive?
Yes. Stellar Data Recovery for Mac can scan and recover files from inaccessible or unmountable Mac drives, including SSDs and external storage devices.
2. Will running Disk Utility > First Aid erase my data?
No. Disk Utility’s First Aid attempts to repair your Mac hard drive without deleting data, but you should back up your important files before running any repairs.
3. Is Stellar Data Recovery for Mac free?
Stellar Data Recovery for Mac offers a free trial to scan and preview recoverable files, and you can recover up to 1 GB of data for free. To save more recovered data, you’ll need a paid license.
4. Can I repair the Mac hard drive after recovering my data?
Yes. After you recover your Mac data, you can reformat the drive or use macOS repair tools to restore its normal operation.
5. Does Stellar support APFS and encrypted volumes?
Yes. Stellar works with APFS, HFS+, encrypted Mac volumes, and other Mac-compatible file systems.


