| Summary: Despite constant vigilance, it is not uncommon for RAID setups to fail. With new services on the market, it is now possible to rebuild RAID 5 without losing data. If you really want to rebuild RAID 5 without losing data, then your best bet is to bring in the pros, like those at Stellar Data Recovery. |
|---|
RAID drive arrays often face two choices:
- either continue working at the risk of losing data, or
- Stop working and save data.

Table Of Contents
Through the course of this article, you will learn the following things:
- A Brief Introduction To RAID Setups
- How To Recover Data From RAID Before Rebuild(s)
- How To Rebuild RAID 5 Without Losing Data
- Rebuild RAID 5 With Two (Or More) Failed Drives
- Why Stellar?
- Frequently Asked Questions
- Things To Remember
And now, without any further ado, let us get into the article.
A Brief Introduction To RAID Setups
RAID stands for “Redundant Array Of Independent Disks”. Long story short, RAID systems take many hard disks and combine them into one logical unit.
This increases reliability and/ or performance and/ or capacity.
There are three main components to a RAID protocol:
- Striping: Where a piece of data is split across multiple locations (drives). This way, if one drive fails, the others are still accessible.
- Mirroring: As the name suggests, this is where each drive in the array is mirrored (duplicated). However, this usually halves the storage capacity of the array.
- Parity: A complex operation involving XOM calculations (exclusive OM). Parity ensures redundancy compliance at the expense of write speeds.
Now, RAID 5, which is our focus for today, is a protocol that uses both striping and parity data writing algorithms.
This makes it harder to rebuild RAID 5 without losing data, as compared to, say, RAID 1 which uses mirroring only.
But first, let’s understand what might create a situation, where you have to rebuild a RAID or recover data from a RAID drive.
- In cases where a RAID array, such as RAID 5, is operating in a degraded mode due to a disk failure, it’s advisable to recover data before rebuilding.
- This precaution is especially important if the RAID has been in this compromised state for an extended period, or if there are concerns about the health and longevity of the remaining disks.
- The reason is, the rebuild process is intensive and can stress the other drives, potentially leading to another failure.
- To mitigate the risk of data loss during the rebuild, it’s prudent to first secure and back up the existing data.
- This ensures that even if complications arise during the rebuild, critical data remains safeguarded.
How To Recover Data From RAID Before Rebuild(s)?
Here’s a step-by-step breakdown of “How to recover data from RAID before rebuild“:
1. Assess the RAID Status
Before taking any action, check the status of the RAID array using RAID management software or the RAID controller’s interface. Identify which disk(s) have failed.
2. Backup Existing Data
If the RAID is still accessible in a degraded mode, immediately backup all critical data to an external storage device or cloud storage.
3. Use RAID Recovery Software
If the RAID is not accessible, consider using specialized RAID recovery software. These tools can help reconstruct the RAID parameters and retrieve data even from a degraded RAID.
4. Avoid Writing New Data
Do not write any new data to the RAID array until the recovery process is complete. Writing new data can overwrite lost data sectors, making recovery more challenging.
5. Consult with Experts
If you’re unsure about the recovery process or if the RAID recovery software doesn’t yield results, consider consulting with data recovery experts who specialize in RAID configurations.
6. Initiate RAID Rebuild
Once you’ve secured your data, you can proceed with the RAID rebuild process by replacing the failed disk(s) and using the RAID management tools to rebuild the array.
How To Rebuild RAID 5 Without Losing Data?
Let us learn how to rebuild raid 5 without losing data.
RAID 5 can easily handle one drive failing. However, if more drives fail, this could result in a complete loss of all data.
Before we begin, note a major oversight that many people make when trying to rebuild RAID 5 without losing data:
Remember that the file system on your new drive needs to match the rest of the drives.
Even though your file system (NTFS, exFAT, etc) is independent of the RAID level, this is a problem if you want to rebuild RAID without losing data.
RAID 5 uses striping which writes data across multiple disks. If you write data via striping to one NTFS drive and one exFAT drive, naturally there will be problems.
This is why it is recommended to format the drive you are replacing to the same File Management System as the other drives in the RAID system. This is key if you want to rebuild RAID 5 without losing data.
Here are the best steps to rebuild a failed RAID 5 array:
1. Find the Faulty Drive
Identify which drive in the RAID 5 array isn’t working. Most times, there are signs or messages indicating the problematic drive.

Note: RAID 5 is only designed to handle one drive failing.
If two or more drives in your RAID 5 array have failed, you need specialized help.
Important: Stellar DataRecovery can help, but more on that later.
2. Replace the Damaged Drive
Shut down the system and swap out the faulty drive with a new one that matches or is compatible with the others.
It is important to note that most professional setups have the same model of drives in an array.
Important: It is advisable to replace the failed drive with the exact same make and model as the others in the RAID 5 array.
3. Access the RAID Controller Configuration Utility
Turn on the computer and access the RAID controller’s configuration utility during the startup process (usually by pressing specific keys).
The keys you need to press are usually displayed when the computer is booting.
The message will look something like: “Please press Ctrl + R” to enter RAID Utility Editor.
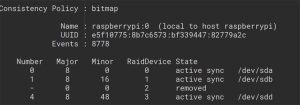
Now, in our example, we have used mdadm which is a Linux utility, but your raid utility could be OEM, so look carefully.
In the screenshot above this point, the Synology utility tells you exactly which drive has failed.
In this particular case, you can repair it directly from there after replacement.
Important: If you do not know how to enter the RAID Configurator, you can check the manufacturer’s website.
Just hit the search button (there will definitely be one). Then, type in your RAID controller model number.
4. Connect the New Drive to the RAID Array
Inside the RAID controller utility, connect the recently replaced drive to the correct RAID 5 array slot.
You can find which bay the drive needs to be installed inside your RAID configuration editor.
Remember to check that the new drive has been accepted by the RAID configurator before moving on to step #5.
Important: If your drive bay has multiple empty spaces, place the faulty drive where the RAID CCU tells you to. You cannot just put it anywhere.
This is a very important step if you want to rebuild RAID 5 without losing data.
5. Initiate the Rebuilding Procedure
RAID 5 uses parity as well as striping. The stored parity data allows the RAID controller to rebuild the missing drive. It is remarkably similar to a game of sudoku, but that is an article for another day.
For now, navigate through the internal menus in your RAID configurator, and locate an option related to repair.
Select the array that you replaced the drive in, and confirm that you want to repair it.
Begin the RAID rebuild process. The RAID controller will automatically start rebuilding the array using the existing data and parity information.
Note: The screen will be different depending on what software your RAID CCU uses.
6. [Optional]: Monitor the Progress of the Rebuild
Keep an eye on the rebuild progress within the RAID controller’s interface. This procedure might take several hours depending on drive size and data amount.
Important: If you are using enterprise-level storage, dedicated disk monitors could be a lifesaver in the future.
They can tell you the health of a drive in real-time, as well as loads of other useful information.
7. Ensure Uninterrupted Rebuild
Avoid turning off the system or interrupting the rebuild process. Interruptions could result in data loss or corruption.
8. Confirm Successful Rebuild
After the rebuild is complete, verify that the RAID array is healthy again and that all data is accessible.
And that’s it. Those were the best steps to rebuild a RAID 5 array.
You can use the steps above to:
- Rebuild RAID 0 Without Losing Data,
- Rebuild RAID 1 Without Losing Data, and
- Rebuild RAID 5 Without Losing Data.
RAID 0 will come with additional complications (because no Parity data), but the process is essentially the same.
Again though, this is a topic for another day.
Rebuild RAID 5 With Two (Or More) Failed Drives
Other than RAID 0, all other RAID configurations will come with at least one “hot drive”. This is basically a substitute, ready to take the place of the failed drive so operations are not halted.
However, the substitute needs to be replaced, right? That is what you just did by replacing your failed RAID 5 drive above.
However, what if both the original drive and the substitute failed? Unfortunately, there is nothing for the user to do, or indeed, that the user can do at this stage.
The only option is to call in forensic experts in data recovery who have experience dealing with RAID 5 failure.
Note: Loss of one drive in RAID 5 is termed an “operational risk”, loss of two or more drives in RAID 5 is listed as an “operational failure”.
Stellar Data Recovery has a specialized service offering RAID and NAS data recovery services. You can navigate to this link to get a 100% free cost estimate quotation for your RAID 5 recovery.
Remember, if you are not 100% sure of what you are doing, you should probably leave the whole business up to the experts.
Why Stellar?
- Stellar has over 30 years in the data recovery business.
- We are trusted by major international players such as HDFC, the Government of India, Infosys, HCL, Dell, Sony, And FedEX, among many others.
- We have over 100 dedicated engineers who are experts in data recovery across all kinds of storage media.
- We operate in a class 100 clean room (ISO Class 5 clean room). This is very conducive to our data recovery efforts, because storage media are very sensitive devices.

- We have over 3 million satisfied customers and have received awards on both national and international stages. In India, we have branches in 14 well-connected major cities, down from Delhi to Bangalore, and across from Mumbai to Kolkata.
- Lastly, we have a presence in over 190 countries worldwide, making us a true global leader in the field of data recovery.
Frequently Asked Questions
1. My RAID 5 Array has two failed drives. What are my options?
If two or more of your drives have failed, there is not a single RAID controller in the world that can help you. As we have said, you need to call in a data recovery company that has experience in RAID 5 recovery.
2. How long does the RAID 5 rebuilding process typically take?
The rebuilding process’s duration varies based on drive size and data amount. It can take several hours; monitoring progress is essential.
3. What is the success rate of RAID 5 data recovery?
The success rate of RAID 5 data recovery varies depending on the specific case, including the extent of damage and the expertise of the data recovery service. It’s best to consult a professional for an accurate assessment.
4. Are there any preventive measures to avoid RAID 5 failures?
Regularly monitoring the health of drives, performing timely backups, and using high-quality hardware components can help reduce the risk of RAID 5 failures.
5. Can I rebuild RAID 5 if the controller is damaged?
If the RAID controller is damaged, rebuilding RAID 5 may require specialized expertise. Consult a professional data recovery service to assess the extent of the damage and potential recovery options.
6. Is it possible to recover overwritten data in a RAID 5 setup?
Recovering overwritten data in a RAID 5 setup is extremely challenging and often not feasible. It’s crucial to avoid overwriting data and seek professional assistance promptly.
7. Are there any free tools available for RAID 5 recovery?
While there are some free RAID recovery tools available, they may have limited functionality and may not guarantee successful recovery. Professional data recovery services often provide more reliable results for RAID 5 recovery.
Things To Remember
Even if you cannot see any problems with your RAID array, it is never a bad idea to have them diagnosed occasionally.
Crucially, if you suspect that your RAID system has a failed drive, cease all write operations immediately.
Like we have stated above, overwritten data is extremely tricky to recover, and is oftentimes simply not feasible.
Lastly, if you are facing frequent drive rejections (the new drive disappears), this indicates an improperly inserted drive into the bay.
Remove the drive, clean out the connection points on both the drive and the drive rack, and reinsert it.
With that, we hope that you found this article useful, and we will see you in the next one.


