How to Recover Deleted or Terminated EC2 Instance?
-
Written By Sapna Trivedi
-
 Updated on December 10, 2024
 -
 Min Reading 3 Min
 - Share

Summary: Have you deleted your EC2 instance and want to Recover Deleted or Terminated EC2 Instance? In this post, we’ll discuss restoring a deleted EC2 instance. As the type of storage plays an important role while restoring the instance, we’d also briefly discuss about storage.
The Amazon Elastic Compute Cloud (EC2) instance is a virtual server that hosts/runs applications on Amazon Web Services (AWS) infrastructure. You can have multiple EC2 instances, which are launched from their images called Amazon Machine Image (AMI).
If you delete an EC2 instance, you can restore it only if you’ve attached Elastic Block Storage (EBS) volume to your EC2 instance and have created an EBS snapshot of the EC2 instance.
In this post, we’ll discuss ‘how to restore a deleted or terminated EC2 instance’. But before that, it’s important to get familiar with EBS volume and EBS snapshot.
What is EBS Volume and EBS Snapshot?
EBS volume is similar to Direct Attached Storage (DAS) or Storage Area Network (SAN). It’s a block-level storage volume that can be attached to a single instance. It can also be attached to multiple EC2 instances by using Amazon EBS Multi-Attach. EBS storage persists separately from your running EC2 instance, similar to a networked hard drive mounted as a storage volume.
You can back up the EBS volume to Amazon Simple Storage Service (Amazon S3) in the form of EBS snapshots. These snapshots are the incremental backup of the EBS volume. This means the changes in data are appended to the most recent snapshot you may have created. The nature of the EBS snapshot is the same as that of the original volume.
How to Recover Deleted or Terminated EC2 Instance?
Create an AMI from EBS Snapshot
To restore a terminated or deleted EC2 instance, you can create a new AMI (image) from the snapshot. Once you’re able to create the image, launch an instance from this image to restore the instance.

Image source : aws.amazon
Here, we’re using Amazon Console to restore the terminated instance. You can also use Amazon CLI to do this.
- Open Amazon EC2 console at Amazon Console
- In the navigation pane, choose Elastic Block Store, Snapshots
- Select Create Snapshot
- Locate the volume by typing the name or ID of the volume
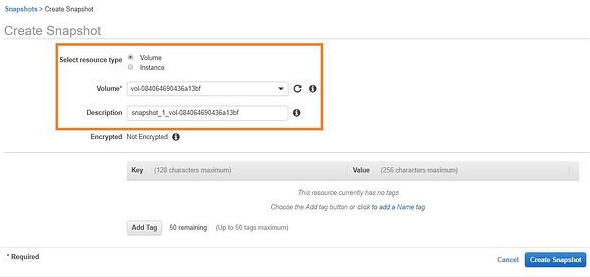
Image source : cloud.netapp.com
You’ll see a list of options.
- Select the volume from the list
- Choose the snapshot
- Click Actions >> Create Image
This opens a Create Image from the EBS Snapshot dialog box.
- In the Create Image from EBS Snapshot dialog box, provide name, description, and the following information:
- Architecture: Choose i386 for 32-bit or x86_64 for 64-bit.
- Root Device Name: Provide a name for the root volume
- Virtualization Type: Choose the type of virtualization – paravirtual (PV) or hardware virtual machine (HVM) virtualization. The instance launched from the created AMI would use the type of virtualization you choose from here
- Once you’ve filled in the information, click Create button at the bottom-right corner of the Create Image from the EBS Snapshot dialog box
- In the navigation pane, choose AMIs
- Select the AMI that you just created, and then click Launch
- Follow the wizard to launch your instance
Launching an instance from the AMI would get you back the terminated instance and its data. This works because the AMI is created from the snapshot of deleted EC2 instance volume.
Conclusion
Amazon EC2 service helps you run the servers without having the need to determine, install, and manage the hardware. In simple steps, you can create EC2 instance.
However, if by any chance, you’ve deleted or terminated your EC2 instance, you may never be able to restore it. You can restore a deleted EC2 instance if you’ve attached your EC2 instance with EBS volume and have a snapshot as a backup of the volume. From this backup, you can create a new image and use it to launch an instance.
About The Author

Sapna Trivedi is a Sr. Online Marketing Executive at Stellar. She has more than 5 years' of experience in the data recovery industry. Specifically, she has knowledge of data recovery services, photo recovery software, and SQL Repair software. She has always been a learner and she loves to implement her technical & marketing skills in her professional career. She has been successful in creating a blend of her hard skills and soft skills and utilize it effectively in her domain area of expertise.