How to Restore Database in SQL Server?
-
Written By Sapna Trivedi
-
 Updated on October 10, 2025
 -
 Min Reading 6 Min
 - Share

| Summary: In this post, we’ve discussed different methods to restore the database in SQL Server from the backup files. You can restore the database from a backup file by using SQL Server Management Studio (SSMS), executing the T-SQL queries, or using the SqlBackupAndFtp Application. However, if the backup is obsolete or not available, you can use an advanced SQL database recovery tool to resolve issues with your database and restore all the database components. |
|---|
An SQL Server database may become unusable or get corrupt due to various issues, such as hardware failure, sudden server termination, file system damage, virus attacks, etc. In such instances, the best option is to restore the SQL database by using the backup (.bak) file. Here, we will be discussing different ways to restore the database in SQL Server from the backup.

Methods to Restore SQL Server Database from Backup File
You can restore the SQL Server database from the backup file seamlessly with the help of:
- SQL Server Management Studio (SSMS)
- T-SQL Queries
- SqlBackupAndFtp Application
| Methods | Steps to Execute |
| SQL Server Management Studio (SSMS) | Connect to your SQL Server, and right-click on the “Databases” directory. Read More… |
| T-SQL Queries | RESTORE DATABASE [Database Name] FROM DISK Read More… |
| SqlBackupAndFtp Application | Go to the History & Restore section of SqlBackupAndFtp Read More… |
1) SQL Server Management Studio (SSMS)
SQL Server Management Studio is a software with a graphical user interface for connecting and working with MS SQL Server. In addition, SSMS offers tools to configure, manage, and administer all the components within MS SQL Server.
If the SSMS is installed on your system, follow the below steps to restore the database from the backup file.
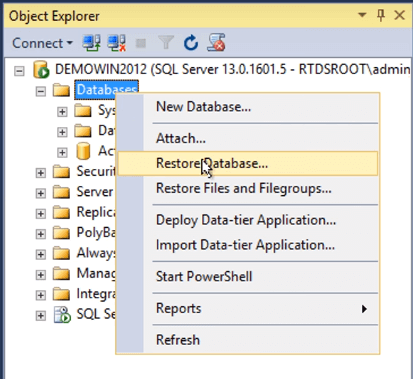
- Open SSMS and connect to an instance of the SQL Server Database Engine in “Object Explorer”.
- Double-click on the instance to expand it further.
- Navigate to “Databases” and right-click on it.
- Select “Restore Database” from the opened list.
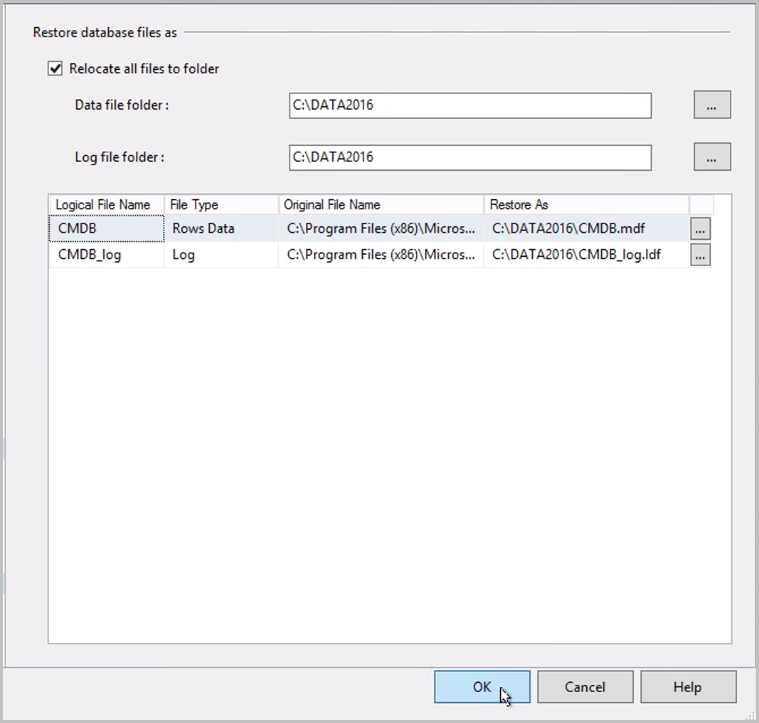
- Select the “Device” option and choose the respective backup file.
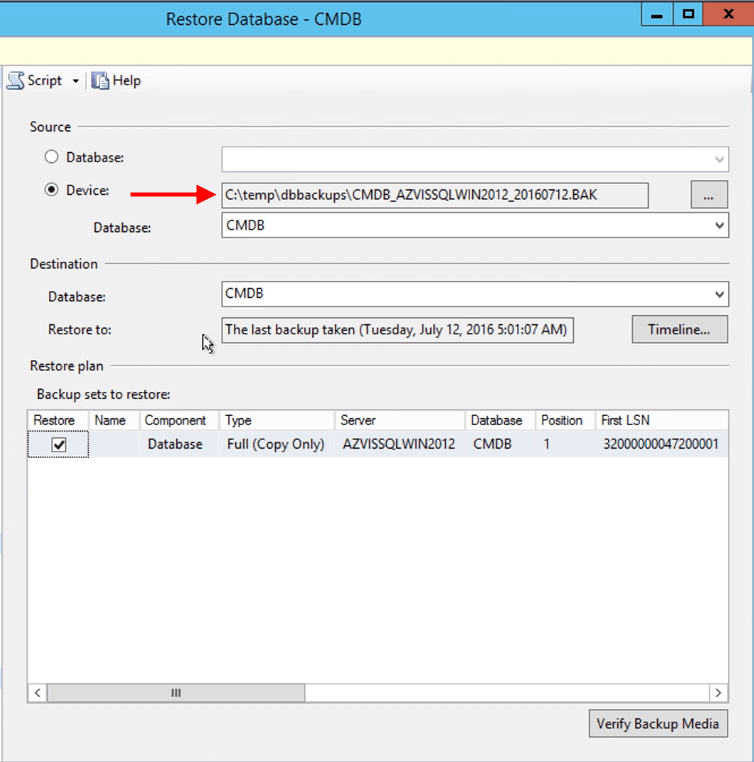
- Once you select the file, click on “OK”.
- You will receive the message “Database [Database Name] restored successfully”.
![SQL_server_mgmt_studio[1]](https://www.stellarinfo.co.in/blog/wp-content/uploads/2021/08/SQL_server_mgmt_studio1-300x156.png)
- Refresh the database. You will be able to see the restored database in the “Object Explorer” window.
![obj-explorer[1]](https://www.stellarinfo.co.in/blog/wp-content/uploads/2021/08/obj-explorer1-300x261.png)
2) T-SQL Queries
You can use the T-SQL command – RESTORE DATABASE to restore the database from the SQL Server. You can run this command in SSMS, SQLCMD utility, or any third-party application. This command restores the database using full, differential, and transaction log database backup.
a) Restore Full SQL Server Database Backup
The full backup includes all the details to restore the database to the point in time when the backup process was completed. If the database already exists, it will overwrite the files. For example, you need to restore the ‘TestDB‘ database with the backup file name ‘TestDB_Full.bak’, which is stored in the ‘E:\’ drive. In that case, execute the following command.
RESTORE DATABASE TestDB FROM DISK = ‘E:\TestDB_Full.bak’
GO
b) Restore Differential SQL Server Database Backup
The differential backups include the changes that occurred in the SQL database since the latest full backup. The latest differential backup compiles all the changes of all previous differential backups. Thus, you just need to restore the most recent differential backup.
Before you restore the differential backup, you need to first run the query to restore the full backup with the NORECOVERY option. Then, restore the last differential backup with the RECOVERY option.
RESTORE DATABASE TestDB FROM DISK = ‘E:\TestDB_Full.bak’ WITH NORECOVERY
GO
RESTORE DATABASE TestDB FROM DISK = ‘E:\TestDB_Diff.diff’ WITH RECOVERY
GO
C) Restore Transaction Log SQL Server Database Backup
The transactional log backups consist of all the transactions that occurred between the last full backup and when the backup process had been completed. Therefore, you need to restore all the transaction log backups created after the last differential backup in the same sequence as they were created.
Log backups are restored after the full and differential backups. You need to execute the following commands.
RESTORE DATABASE TestDB FROM DISK = ‘E:\TestDB_Full.bak’ WITH NORECOVERY
GO
RESTORE DATABASE TestDB FROM DISK = ‘E:\TestDB_Diff.diff’ WITH NORECOVERY
GO
RESTORE LOG TestDB FROM DISK = ‘E:\TestDB_log1.trn’ WITH NORECOVERY
GO
RESTORE LOG TestDB FROM DISK = ‘E:\TestDB_log2.trn’ WITH RECOVERY
GO
3) SqlBackupAndFtp Application
If you have used SqlBackupAndFtp to create the backups, you can easily restore the database from the history pane.
![history_and_restore[1]](https://www.stellarinfo.co.in/blog/wp-content/uploads/2021/08/history_and_restore1-285x300.png)
It is used to restore the database on the same server where the backups were created. The best part is that you can select any backup type (full, differential, or log), and all other required backups will be restored automatically.
Follow the below steps to restore the database using SqlBackupAndFtp:
- Go to the “History & Restore” section of SqlBackupAndFtp.
- Select the backup that you want to restore.
- Click on the three dots button on that line.
- Select “Restore from Backup…” and follow the subsequent steps.
Note: In case you face any issue, such as a power surge, operating system malfunction, virus attack, etc., while restoring the database, it will make the database corrupt. As a result, the database will become inaccessible. In such a case, an SQL database repair software, such as Stellar Repair for MS SQL comes in handy. It can rebuild the corrupt database and recover all the components successfully.
Also Read, How to Restore Database from MDF File in SQL Server?
Restore SQL Server Database Using SQL Repair Software
Stellar Repair for MS SQL can repair MDF and NDF database files, and restore all the objects from the files while maintaining the integrity and hierarchy of database objects.
Follow the below-mentioned steps to use Stellar Repair for MS SQL.
- Step 1: Download, install, and launch the Stellar Repair for MS SQL software.
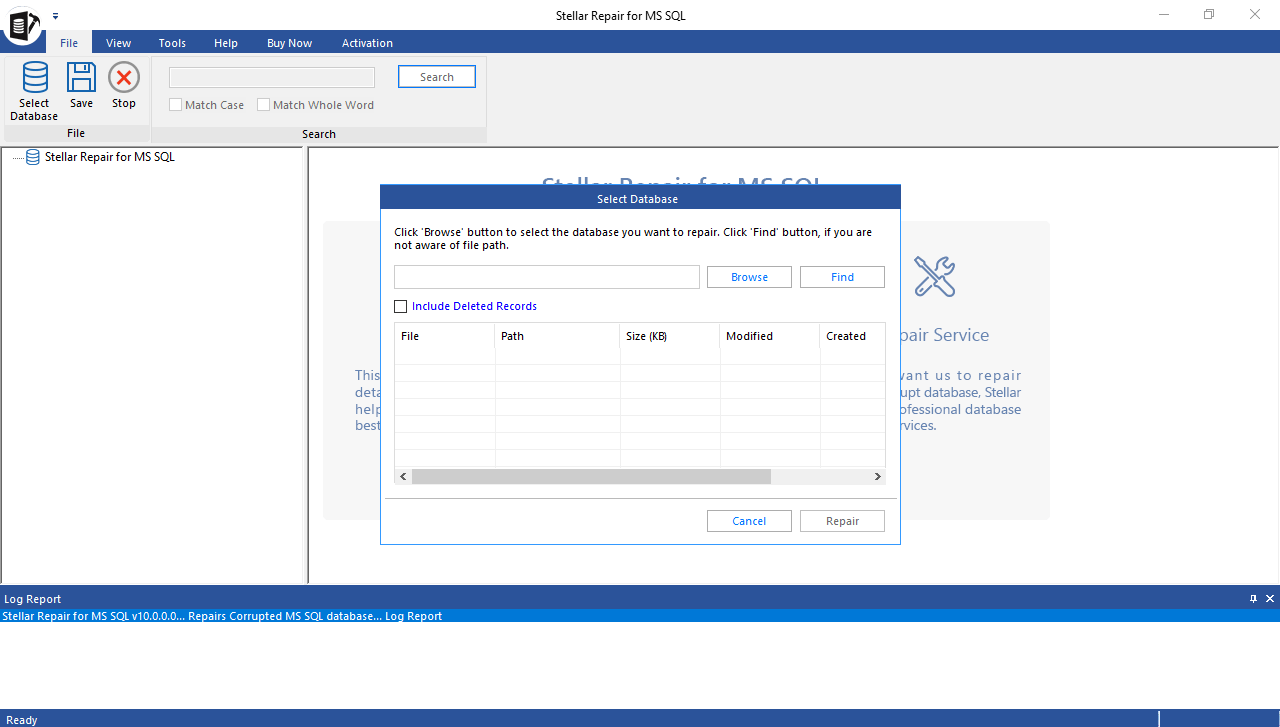
- Step 2: Click on the “Browse” button, if you know the location where the corrupt database is stored. Otherwise, click on “Search”. The software will search for the database files in a particular drive volume.
- Step 3: Select the corrupt database. If you want to include the deleted records in the process, check the checkbox “Include Deleted Records”.
- Step 4: Click on “Repair”.
Also Read – How to Repair Corrupted SQL Database?
- Step 5: Within a few minutes, you will view all the objects of the repaired database in the left pane of the window in tree-view format. You can see a particular object in detail by double-clicking on it.
- Step 6: You can save the repaired database in MDF, CSV, HTML, or XLS file format. If you choose CSV, HTML, or XLS, you need to provide the location where you want to save the repaired database. In case you choose MDF as the desired file format, you can select the new database or live database. If you go with a new database option, you need to fill in the details to connect to the server.
- Step 7: Click on “Save”. You will see the message prompt “File saved at the desired path”.
- Step 8: Finally, click on “OK”.
Activate the full version of Stellar Repair for MS SQL – read on how to get the activation key of Stellar Repair for MS SQL.
Bottom Line
A good backup always works when it comes to restoring the database from unforeseen disasters. Nevertheless, if the database is corrupt and the backup is not available, then you can use an advanced SQL repair tool, such as Stellar Repair for MS SQL. This software can easily repair MDF and NDF database files and restore them to the original or new file at the desired location.
Also Read: How to Fix Recovery Pending State in SQL Server Database?
About The Author

Sapna Trivedi is a Sr. Online Marketing Executive at Stellar. She has more than 5 years' of experience in the data recovery industry. Specifically, she has knowledge of data recovery services, photo recovery software, and SQL Repair software. She has always been a learner and she loves to implement her technical & marketing skills in her professional career. She has been successful in creating a blend of her hard skills and soft skills and utilize it effectively in her domain area of expertise.