Summary: Seeing your PC error “Getting Windows Ready Stuck” can be frustrating. Here, you can find the most effective solutions for fixing this issue. Try them individually to fix the PC stuck on getting Windows ready; do’t turn off your computer. Remember, in cases where files may have been lost, employing data recovery methods is essential for efficient retrieval.
What Is the ‘Getting Windows Ready Stuck’ Issue?
When your Windows PC freezes on the “Getting Windows Ready” screen during startup or updates, it is known as the “Getting Windows Ready Stuck” issue. The system may not be able to proceed due to system file faults, update conflicts, incompatible software, or hard disk problems.
Now that you have an idea about the error, let’s explore why your computer might be getting laptop stuck on this issue.
Why Does My Computer Get Stuck on “Getting Windows Ready”?
There are several reasons why your Windows computer might get a “stuck on getting Windows ready” screen. Here are some of the most common culprits:
System File Errors or a Corrupted Operating System can happen for various reasons, including abrupt shutdowns, malware attacks, or even errors during updates.
- Windows Update Issues: Conflicting updates or problems during the update process can cause the system to freeze.
- Conflicting Data Recovery Software: Software that communicates with the Windows kernel during startup can interrupt & prevent successful loading.
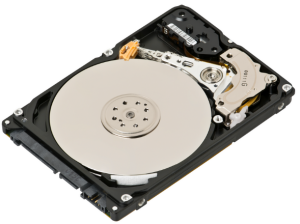
- Hard Drive Problems: Bad zones, disk integrity corruption, or nasty attacks can also prevent the system from reading files needed to boot properly.

Let’s explore what you must do before fixing your laptop Windows.
What Must Be Done Before Fixing Windows?
Important files must be backed up to prevent the computer from getting window ready stuck. Imagine taking your car to a mechanic; he or she will be the first to deliver your goods. Let’s see how to find & save those files.
Step 1: Locate the Hard Disk Drive
This step is usually not necessary to save files before setting up your PC. More suitable for data recovery after a drive has failed. Modern desktops often handle file management without direct access to the hard drive.
Step 2: Click Start
Navigating your files through the Windows search function is the first step. The start menu is a launching pad for programs & files on your computer.
Step 3: Scan the location
Instead of finding the exact location of your hard drive, you can use the search bar in the Start menu.
Type the name of the specific file you want to save, or use broad terms such as “documents” or “images” to search for all such files.
The search will show the location of the files on your computer.
Step 4: Toggle through Filters
The search function can give you filters to refine your results. For example, you can conduct research by:
- Modified date: Find the most recent files you created or edited.
- File Type: Search for specific file types, such as.docx or.jpg.
Step 5: Preview & restore files
Once you have the file you want to save, right-click on it & select Copy .
Open your external storage device, like USB flash drive or external hard drive, & navigate to the folder to save the copied files.
Right-click in the space & select Paste to copy the files to your external storage.
Having covered the necessary pre-fix steps, let’s examine the ways to address the “Getting Windows Ready” stuck issue.
Methods to Fix ‘Getting Windows Ready’ Stuck Issue
While we delve into solutions for “windows stuck on getting windows ready”, we must acknowledge that sometimes even the simplest fix is also the most effective.
Occasionally, the installation process will take longer than expected, especially for larger updates. Give your PC a good 2-3 hours to complete the task before troubleshooting.
Method 1: Do Nothing but Wait
As mentioned earlier, waiting might be all it takes. Other issues, especially important changes or large file sizes, may take some time to process. Resist the urge to quickly restart your computer, which can mess up the installation & cause more problems. Grab a coffee, catch up on a read, & let your PC do its magic.
Method 2: Disconnect Any Peripherals
Sometimes external devices such as printers, scanners, and other USB drives can interfere with installation. It could be due to a driver conflict or simply because the PC needs to install its resources on the installation task. To prevent this, restart your computer & remove any unnecessary peripherals before attempting a reboot.
Method 3: Reset the BIOS
The BIOS is the main firmware that your computer uses to boot up & initialize the hardware components. Sometimes these settings can be corrupted, causing installation issues. Let’s see how to fix a “computer stuck getting windows ready”:
Step 1: Enter BIOS & check Boot Priority
Restart the computer & watch the key prompt during the first boot screen. It usually includes DEL, F2, F10, or ESC, depending on your motherboard. This key allows you to access the BIOS configuration utility.
Once in the BIOS, use your arrow keys & Enter key to scroll to the “Boot” section.
Step 2: Set the Boot Drive Priority
Make sure your main hard drive is listed, and your operating system is set as the first boot option in the priority list. Use the + & – keys to adjust the settings.
Step 3: Save the changes & exit the BIOS
Check the Save & Exit option in your BIOS settings. Now, follow the instructions to save any changes you have made.
Your computer will then restart with the updated boot sequence.
Step 4: Restart the machine
Restart the computer as usual. A corrected boot sequence can solve the problem.
Method 4: Try Booting the Computer in Safe Mode
Safe Mode is Windows’ minimal startup environment that only installs necessary drivers. It can help prevent conflicts that could potentially interfere with data recovery software. Here are the steps to enter Safe Mode:
Step 1: Force Shut Down the device
When your computer goes to the “Getting Files Ready” screen, hold the power button for 30 seconds and force it to turn off.
Step 2: Turn on the Device
Power on your computer as usual.
Step 3: Windows Messages Failed to Start
You may see a “Windows Failed to Start” message.
Step 4: Select the Advanced Repair option
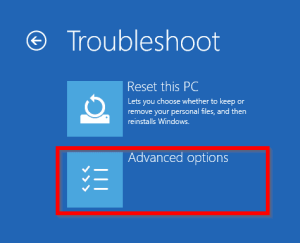
Select Advanced Repair Options from the displayed troubleshooting menu.
Step 5: Select Troubleshooting Options
Go to Troubleshoot & then select Advanced options .

Step 6: Click on Restart & Select Safe Mode
Under Advanced options, you will see a Restart Now button. Click on it & select Safe Mode from the restart options.
Step 7: Restart the Device in Safe Mode
Your computer will restart in Safe Mode. Then, try the installation again. If the installation proceeds successfully in safe mode, it indicates a conflict with data recovery software in normal mode.
Method 5: Delete Problematic Files
If you are stuck at Windows Getting Ready screen, proceed with caution. If you don’t do it right, a lot of problems can arise. This method uses a command prompt to delete corrupt system files that may interfere with the installation process.
Step 1: Restart Device & Troubleshooting
Restart the computer normally. Once created, you can access the Advanced Startup options.
You can access it by pressing the Restart button in the Start menu and holding down the Shift key.
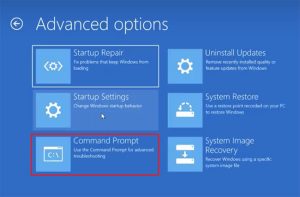
Step 2: Select Advanced Options & Command Prompt
In the Advanced Startup options, go to Troubleshoot and select Advanced options .
Select Command Message from the Advanced options menu.
Step 3: Type Command in the Command Box
A command-prompt window will open. You will need to type specific commands to identify potentially problematic files.

Method 6: Restoring Order
If none of these methods work, you can try resetting your device. This is a complicated step, so you’ll want to consult a professional first. It allows you to revert recent changes that caused the installation to fail.
To restore your device, follow these steps.
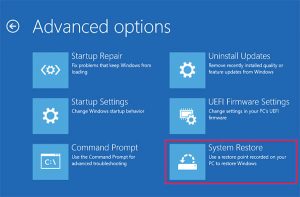
Restart the computer & go to Advanced Startup options.
Go to Troubleshooting > Advanced Features > System Restore .

Follow the on-screen instructions to complete the System Restore process.
Conclusion:
Encountering the “Getting Windows Ready Stuck” error can be frustrating, but understanding the issue is the first step toward resolution. While this guide offers effective solutions, remember that you might also face another common problem: “Getting Files Ready for Installation Stuck“. Both issues can disrupt your workflow, but patience and methodical troubleshooting can help. If these errors persist, don’t hesitate to seek professional help.
Comment below if these strategies helped you overcome these tech hurdles. We also want to hear your suggestions for future topics or any lingering questions. Let’s keep the tech conversation rolling.
FAQs
1. What is the Getting Files Ready for Installation Stuck error?
The Getting Files Ready for Installation Stuck error happens when your computer gets stuck during an update or installation, and it can’t move past this stage. This can be due to a large update taking more time than anticipated, system file errors, or conflicts with other software or peripherals. A bit of patience and some troubleshooting will help you tackle this issue effectively.
2. What do I do if my computer remains Windows-ready?
Have you seen this message for a while? Don’t worry. Updates can be especially time-consuming. Give your PC 2-3 hours to complete the task. If you are still stuck waiting, try holding the power button for 30 seconds to force it to restart. It will completely shut down your PC & allow it to boot up normally on the next attempt.
3. How long do I have to wait to get Windows ready?
Patience is a virtue. Updates can take a while, depending on their size & your system’s resources. If you have not seen improvement for more than 2–3 hours, you may need to be forced to start over.
4. Why does it take so long to fix the windows?
Many factors can cause delays. Larger updates with more files to process will take longer. Additionally, system issues, such as corrupted files or conflicts with software, can slow down the update process. If you frequently encounter this problem, consider seeking professional help to diagnose any underlying issues.


