Your Windows 10 PC came with at least one hard drive. If you can boot, it means the hard drive has at least one partition C.
This is the system partition. It holds Windows files, program files (e.g. Office) and is the default destination for anything you download through your browser.
Most hard drives are large 512 GB to 2 TB. Over time, we come to collect images, movies, music, and much more. It is unsafe to keep everything in a single partition C.
A virus (there are thousands) can disable your hard drive and you will lose everything.
It is better to make partitions, e.g. we can split a 1 TB hard drive into 2-3 partitions of 300 – 500 MBs. If there is a virus attack on one partition, it does not spill over into others and the contents are safe.
How to partition a hard drive in Windows 10? We describe in full.
Advantages of Partitioning
- Makes Windows reinstall easier. Select C: and perform a clean install from USB when the computer slows down.
- Makes repair easier. If Outlook or Word is malfunctioning simply reinstall Windows and Office once more on C.
- Easy to install multiple OS.many like to dual boot Windows 7 and 10 or Linux and Windows 10.
- You can use different file systems e.g. NTFS for C and D and exFAT for E.
- Backups of system drive are smaller. Also it is easier to clone a single partition to another device. If all your work related files are on D and your company gives a new laptop simply copy and paste folders from D on the new laptop.
Additional Reading: Recover Lost Data After Repartitioning A Hard Drive
How to Partition a Hard Drive in Windows 10
How to partition a hard drive in Windows 10 is a question we hear often.
Creating hard drive partitions in Windows 10 is easy and can be done using Windows Disk Management Tool.
The Disk Management Tool has been part of Windows since Windows XP. However, Microsoft has updated it over time and added several new features.
What steps to be taken to partition a hard drive after Windows 10 is installed?
We describe below how to partition a hard drive in Windows 10. It has to be done using the Disk Management Tool.
1. Open Disk Management Tool
Open Windows Disk Management using either of these ways:
1.1 Using Power User menu
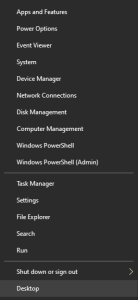
- Press Windows logo + X to invoke the Power user menu
- Select Disk Management from the menu
1.2 Using File Explorer
- Click on the Windows Start Menu icon at the bottom left corner of your screen
- Click on File Explorer
- In the Explorer window that opens right-click on “This PC” on the left
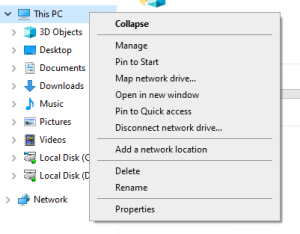
- From the pop-up menu that appears, choose “Manage”
- In the “Computer Management” window that opens, click on “Disk Management” in the left.
1.3 Using Run function
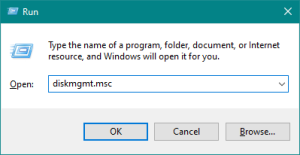
- Press Windows logo + R Key to open the Run utility.
- Type diskmgmt.msc and click OK.
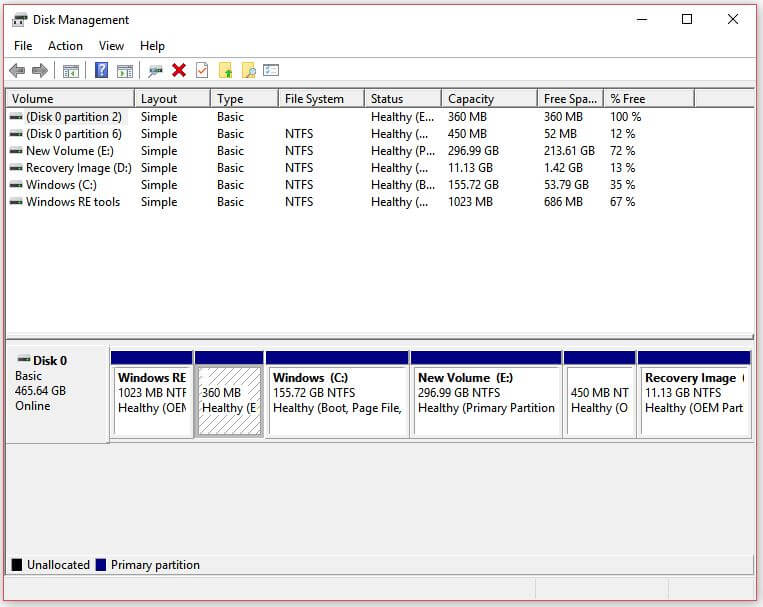
In the Disk Management section, you’ll be able to see your primary hard drive partition as “C:” (default) or another drive letter. It would indicate the size of your system’s storage space.
2. Partition Using Disk Management Tool
There are two ways to use the Disk Management Tool to create a partition.
- The first is to create a partition when there is contiguous free space.
- The second is to create a partition by shrinking an existing volume.
2.1 Create a partition when there is contiguous free space.
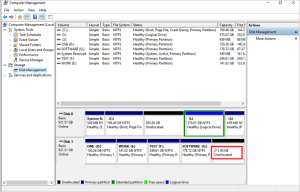
1. Select the hard drive by clicking on it.
Note: If it’s a new drive, you will see unallocated space beside the C: drive where Windows 10 is installed.
2. Right-click on “Unallocated” space and select “New Simple Volume”.
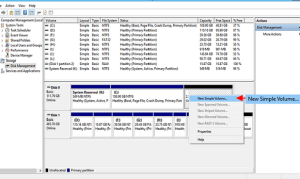
3. In the New Simple Volume Wizard window, click Next
4. In the next window, you get the option to select the size of the new volume.
Note: By default, the complete unallocated space is selected as the size for the new partition. The size of the unallocated space is mentioned in MB. You can use the MB to GB conversion calculator to know how many MBs make the desired GB partition size.
If you want the new volume of a particular size, click the downward arrow to reduce the size of the new volume you want to create. This will allow you to create another partition of the remaining unallocated size. If you want the new volume to utilize all unallocated space, you can go with default options
5. Click Next
6. In the next window, select the desired drive letter from the drop-down list. You can go with default option or select any desired drive letter and click Next
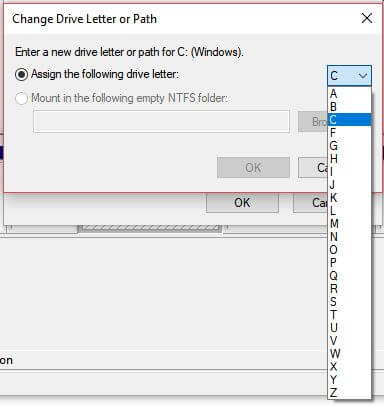
7. In the Format Partition window, you are presented with two options- Do not format the volume and Format the volume with following settings
Note- you need to format the volume to store data in a new partition that you are creating
8. Click Format the volume with following settings
9. In the File System- select NTFS
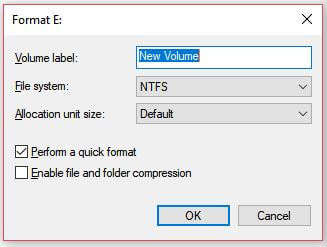
10. Keep the default option for Allocation unit size
11. Type a name for your new partition or you can go by the default name that is New Volume
12. Click Next
13. In the next window, click Finish
Windows will now start the process of partitioning and formatting the new volume. Wait for the process to complete. After the process is completed you will see a new partition appear in the hard drive section of Disk Management. The newly created hard drive partition will mention the drive letter, the size in MB and the volume name.
You can now open File Explorer and check the newly created partition. Since the hard drive is formatted, you can store files and data in this new partition.
2.2 Create a partition by shrinking an existing volume
What if there is no contiguous free space and you have to shrink a volume? The Disk Management Tool can perform that task also.
1. Right click the partition you want to shrink and select Shrink Volume
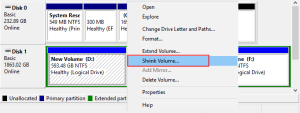
2. In the configuration box that opens up enter how much space you want to shrink. In the below image about 581 GB is being unallocated.
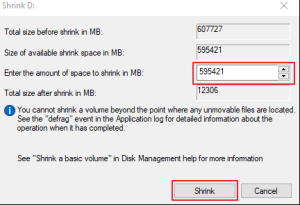
3. When it completes you will have unallocated space.
Now follow the steps given in 2.1 and create a new partition as you want.
That wraps up our guide about how to partition a hard drive in Windows 10.
Additional Reading: Recover Partial Data With Data Recovery Services
Disk Management Tool Functions
- The Disk Management Tool lets you partition and repartition a hard drive.
- Using the Disk Management Tool, you’ll be able to see a map of your hard drives (it can show any number of hard drives).
- The primary partition is labeled as C. this is fixed and cannot be changed. In the past A and B were reserved for floppy but that is redundant. D onwards every drive letter can be a hard drive partition or optical drive (DVD) or hard drive volume (a full hard drive).
- Hard drive numbers start with 0. If you have one hard drive it would read as Disk 0, two would read as Disk 0 and Disk 1 and so on.
- The Disk Management Tool will also show USB drives, DVD drives, and any other storage media attached to the PC internally through ATA, SATA or externally through USB.
- The Disk Management Tool will display details of how much space in each hard disk, how many partitions in each storage media, names of partitions and free space in each.
You can see the Disk Management Tool here shows one hard disk of size 465 GB (probably sold as 512 GB; the rest is taken up for Master File Table and disk management software).
It has 1 GB of Windows Recovery tools, two partitions C and E of 156 GB and 297 GB approximately. There are several more smaller partitions and a Recovery Image of 11 GB in D.
What to Do if Data Loss Happens After Partitioning a Hard Drive in Windows?
While you are creating a partition:
- The Disk Management Tool can crash.
- Your device may power off due to low battery or power failure.
- You can shrink a wrong partition and create a new one.
Any of these incidents might result in catastrophic data loss. Recovering the lost data would become a challenge if there’s no backup.
If you’re facing data loss during or after hard drive partitioning, don’t panic. Take help of professional data recovery experts such as Stellar Data Recovery who can retrieve the lost data easily and without any risk.
You may also try out a data recovery software first before considering a specialized service. However, the decision should consider key factors such as the physical state of your hard drive (too many bad sectors or fragmentation might make it unsuitable for software-based recovery), how important is your data (are your mentally prepared to take any chances with your data?), and your comfort and proficiency level with DIY software tools.
In these circumstances, a professional data recovery service will be a better option instead of software.
Stellar is the global leader in data recovery with the right mix of people, technology, and experience to deliver secure, assured, and efficient data recovery services.
FAQs
1. Does Stellar have data recovery software?
Stellar Data Recovery Software is a top notch software that can recover data if there has been logical loss (e.g. lost partition, deleted files).
It works on both 32 and 64 bit Windows 7, 8, 8.1, 10 and 11.
2. How is recovery software different from recovery service?
Recovery service is needed when the disk has suffered physical damage such as damaged read/write head or scratched platter.
Complete recovery services are offered by Stellar In–Lab service. The hard drive is opened in a CLASS 100 CLEAN ROOM. Experts replace parts as needed and get the drive functional. They then clone the contents and send it to you.
3. Does Stellar have experience in data recovery?
Stellar has been in this domain for 25 years. We have over 3 million satisfied clients and a 5 star rating on TrustPilot. Some of the Fortune 500 clients include Dell, Infosys, Sony and Unilever.
4. Should third party software be used for partitioning?
There is no need. Till Windows 7, some functions did not happen smoothly on Windows Disk Management Tool such as shrink volume. But from Windows 10 all such problems have been resolved.
5. Is there any risk associated with disk partition?
Not at all. If you are careful about clicking and selecting the right options and values there is no problem. Windows has evolved to be as good as any other operating system.
Stellar Remote Recovery Services
|
Stellar is committed to data recovery needs across the country during the COVID-19 crisis. In continuation of our commitment to data care services and to ensure data loss does not hamper businesses or individuals, Stellar will be operating online and provide remote data recovery services. We are available on Chat, Phone and Email. |
|---|
Wrapping it up
We hope you have understood how to partition a hard drive in Windows 10.
Creating hard drive partitions is important to make the data on the hard drive easily accessible.
You need to make hard drive partitions of the right size as per your requirements. Make sure you defragment the hard drive partitions (do not defragment SSDs) regularly so that it will store data in contiguous clusters and improve Windows performance.
Sometimes you might lose valuable data while formatting a drive for partitioning. In that case, take the help of professional data recovery experts to retrieve your lost data.
Additional Reading: How to recover unallocated partition data

