How to Schedule Data Eraser Task in BitRaser File Eraser?

BitRaser File Eraser is a secure data erasing software that helps you erase files, folders, cookies, internet browsing history, application traces, and other crucial data from your Windows PC. The software uses advanced algorithms to erase unwanted files beyond any scope of recovery. It overwrites the selected data on the disk with random 0s and 1s to make it irrecoverable. It also allows you to schedule the data eraser task as per your needs. This blog covers the step-by-step process to schedule data erasure tasks in BitRaser File Eraser software.
What is the Importance of Data Erasure?
There are several instances where it becomes crucial to erase confidential data. When you’re planning to sell or exchange an old computer or when multiple people access the same system, you need to erase the confidential data from the system to avoid data theft.
Here is a common scenario where opting for data eraser software can help.
You’re working in a company where multiple employees access a single system. You might have logged into different websites, which are meant to be confidential. Now, these sites can be accessed by other users as well. In such a situation, you can delete the saved credentials and other confidential data by using file eraser software, like BitRaser. It can completely wipe all the selected data that no one can recover even after using data recovery software.
What are the Benefits of Data Erasure?
Below we have listed some benefits of permanently erasing the data:
- Avoid data breach: When you delete files or format the hard drive, it doesn’t delete data permanently. Anyone can recover the deleted or formatted data by using data recovery software and may use it to exploit you. If you want to dispose of, sell, or donate your system to someone, make sure to securely wipe the data to safeguard against data theft and privacy breach.
- Regulatory Compliance: If you’re running a business, you might have collected confidential client information, including phone number, social security number, address, credit card details, etc. In that case, you have to comply with the data protection laws. If you fail to destroy such confidential data from the system, it may lead to hefty fines and reputational loss. To avoid this, you must use secure file eraser software to wipe files from the storage devices.
- Saves Environment: Rather than physically destroying old storage devices for data destruction, you can opt to securely wipe data by using file eraser software. It’s an eco-friendly method as the disk can be reused without the risk of data theft. This keeps the storage devices out of landfills, thus reducing e-waste.
Steps to Schedule Data Erasure Task Using BitRaser File Eraser
With the BitRaser File Eraser software, you can schedule your data erasure tasks. Follow the below-given steps:
- Firstly, you have to buy the software.
- Then, install and run the BitRaser File Eraser on your Windows PC.
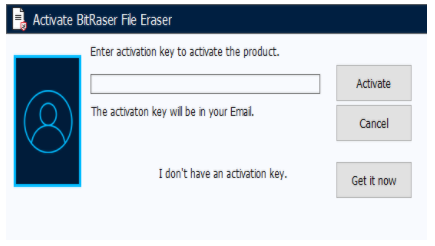
- When done, enter the activation key and click on Activate.
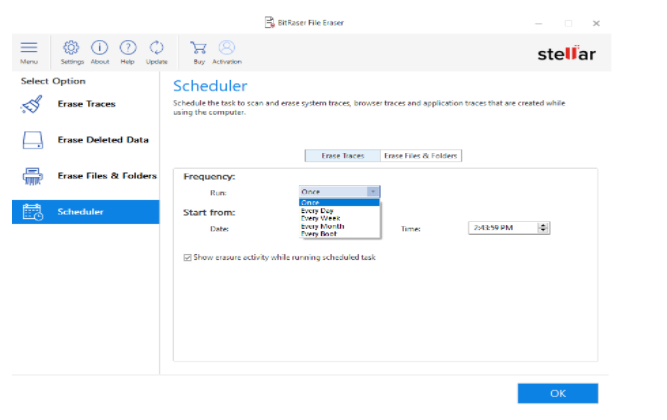
- From the sidebar, click on Scheduler.
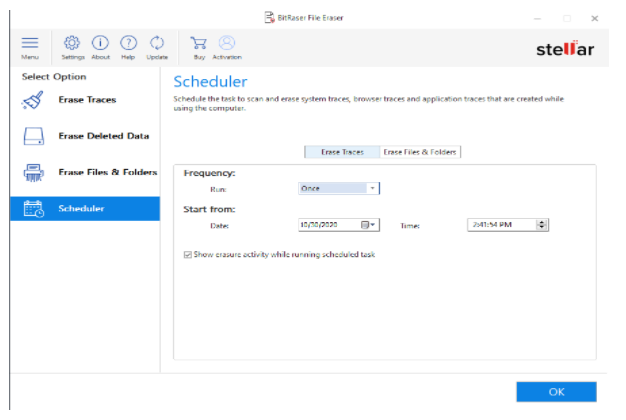
- On the Scheduler screen, it displays two options:
A. Erase Traces
- It is selected by default. Here, you have to specify the Frequency and Start from date and time. Then, click OK.
- It will display a pop-up message stating, “Schedule created successfully.” Click OK.

B. Erase Files & Folders
- To schedule the erasure of files and folders, click on the Erase Files & Folders tab.
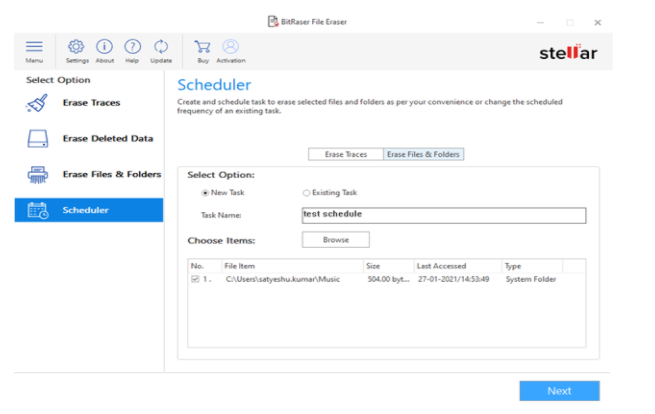
- Under Select Option, choose New Task and specify the task name. Then, click on Browse to add the files or folders to the list and click Next.
- After that, specify the frequency, start date, and time, and then click OK.
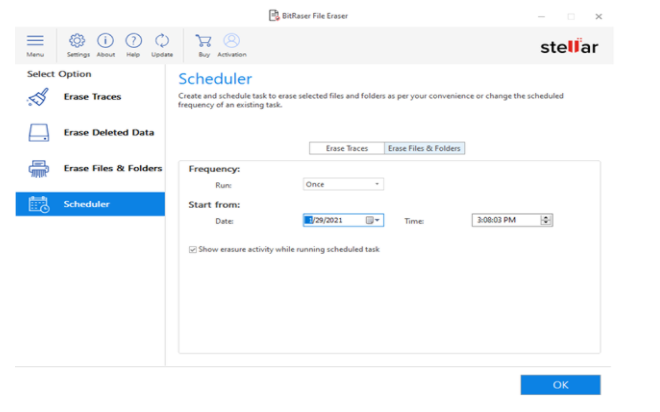
- Once done, a pop-up message stating “Schedule created successfully” displays on your screen. Click OK.
Also Read: What is the Right Way of Formatting the Hard Drive on Windows System?
Once you have scheduled the data erasure task, BitRaser File Eraser software runs at the specified time, provided your computer is on at that time.
- You can view all the scheduled tasks by clicking on the Existing Task option under the Select Option column.
- If you want to modify an existing task, select the required task and click on Edit. On the pop-up window, specify your preferences to schedule the task and click OK.
- To delete an existing task, select the particular task and click on Delete > OK. This will remove the selected task from the existing task list.
Note: Apart from file erasers, BitRaser also offers drive eraser software that allows you permanently delete sensitive data from hard drives, SSDs, PCs, and rack-mount servers.
Conclusion
This blog mentions the detailed process to schedule the data erasure tasks using BitRaser File Eraser software. If you come across any issues while wiping your data, get in touch with our experts to avoid any further issues.
About The Author

Girish is a blogger and writer. He has over 6 years of experience in Data Recovery and Data Eraser technology. In his free time, he writes about technical tips and tutorials.