Stellar Data Recovery for Windows
How to Recover Missing Files & Folders After CHKDSK Command?

| Summary: If you have recently run the CHKDSK command and it resulted in missing files or folders, do not worry. This is a fairly common occurrence and a lot of people around the world report it every day. But the good thing is, it can be easily solved. Let’s understand everything about this command. How you can recover files after “CHKDSK”?
Let’s Get started with the free trial of Stellar Data Recovery Software to recover missing files and folders after CHKDSK Command.
|
|---|

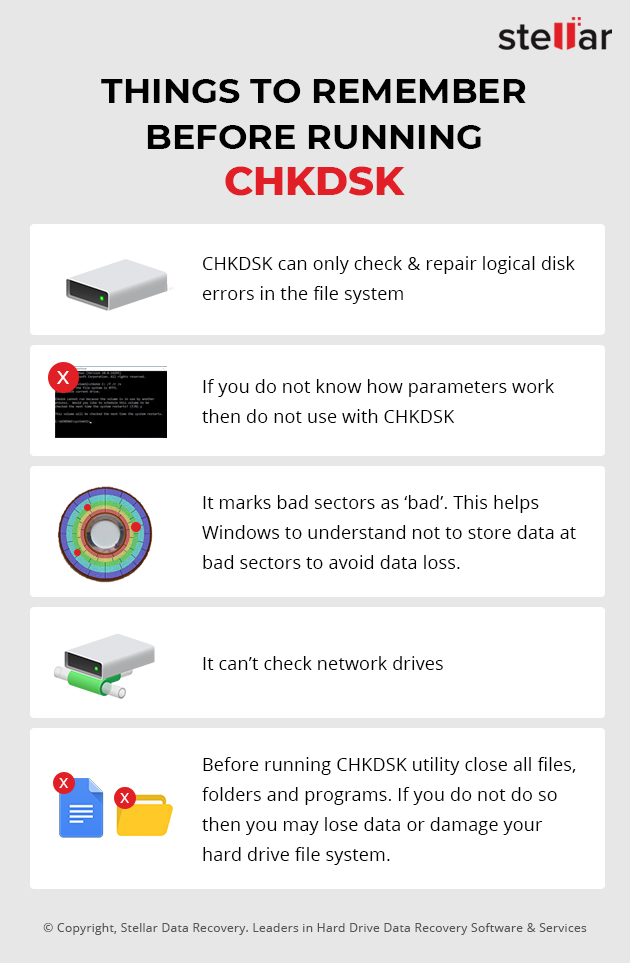
What is CHKDSK Command?
CHKDSK is a Windows command. The general use of this command is for scanning hard disk partitions. This helps to uncover errors in the storage and fix them. The “chkdsk” command generally comes in use for all storage devices like:
- Hard Drives.
- USB Flash Drives.
- SD Cards.
- Memory Sticks.

But sometimes, the error can be located within a file or a folder. This makes the command delete them altogether in a bid to fix the drive. This is mainly done to fix the logical file system. There are two types of CHKDSK Command mentioned below:
- chkdsk /r: This command locates the bad sectors in the storage device. It then recovers any readable information.
- chkdsk /f: This command is used to find errors in the storage device. It then carries out a few necessary steps to fix these errors.
Additional Use of CHKDSK Commands
Here are some additional CHKDSK commands that can be useful for you.
- This command displays the names of all the files during disk checking- “chkdsk /v”.
- This command Forces the volume to dismount – ” chkdsk /x”.
- You can do a quick scan that performs a casual check of the index entries. Can only be used with the NTFS file system-“chkdsk /i”.
- Used to make CHKDSK skip the check cycles within the folder structure. Can only be used with the NTFS file system and reduces the execution time of the check- “chkdsk /c”.
- Used to clear the bad sector on the drive. Can only be used with the NTFS file system- “chkdsk /b”.
Stages of CHKDSK Command
When you run the CHKDSK command, it is usually executed in three stages or steps:
- The command checks the files. The stored data is verified.
- CHDKSK then checks the indexes on the volumes.
- It then goes on to check the security descriptions of every partition.
- Data verification on the storage (Optional)
- Free space verification on the storage (Optional)
How to Recover Lost Files with Stellar Data Recovery Software?
So, we are finally onto the million-dollar question. How can you recover files and folders missing after CHKDSK command? You can recover your files with the help of professional data recovery software. The Windows Data Recovery software can recover any lost or deleted files and folders. This holds true even if the hard disk has been formatted or become corrupted. Simply follow the given steps to recover your data after the CHKDSK command:
Watch the video on “How to recover deleted files for Windows?” with the help of Stellar Recovery Software
- Remove the hard drive from your system.
- Connect this hard drive to another PC. You can easily do this with the help of an HDD enclosure or SATA to USB converter. Please note that you SHOULD NOT use the data recovery software on the same system on which you ran the CHKDSK command.
This is to ensure you do not overwrite any data. - Once you are ready, download the Stellar Data Recovery- Software for Windows.


- Install it on the new system.
- Launch the software when the installation finishes.
- In the window that pops up, choose the files that you need to recover. If you are unsure what to select, simply check the box for ‘All Data’. This will successfully recover all the file types.
- Additionally, check the external hard drive checkbox and the ‘Deep Scan’ toggle switch.
- Once you are ready, click on the ‘Scan’ button. The deep scanning process can take some time to complete.
- Wait for the scan to finish. Once it does, the files and folders that can be recovered will be visible on the ‘Tree View’ panel on the left.
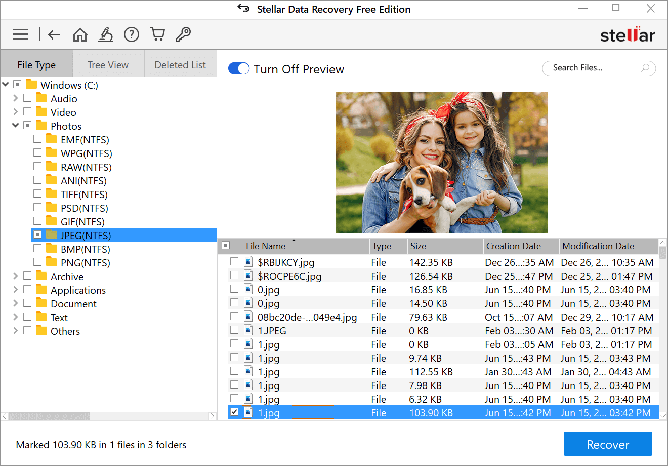
- Click on ‘File Type’. Select the files and folders that need to be recovered. Click on ‘Recover’.
- Select the location where you want to save the files with the ‘Browse’ button.
- Click on the ‘Start Saving’ button to begin the recovery process.
This will successfully recover all your files and folders. You can then copy the data to your storage device and finally connect it to your system. If you want to recover data that consumes a size of 1 GB, then Stellar also provides free data recovery software to recover free data up to 1 GB.
Conclusion
Losing stored files and folders after the CHKDSK command is common. Using the data recovery software from Stellar can help you easily recover your data. But, that’s not the only case where it can be used. You can use the software in practically every data loss situation. Simply install it and scan your storage device to get going.
About The Author

Meenakshi is a technical blogger with experience in writing data recovery tips and tutorials. She knows her way around the data loss problems and is always looking for ways to help out people.