How to Recover Deleted Files from Macbook Pro?
-
Written By Vandita Jain
-
 Updated on July 18, 2024
 -
 Min Reading 6 Min
 - Share

| Summary: The question of how to recover deleted files from a MacBook Pro is one posed by many, and there are many ways to do it. However, the most efficient and effective way to retrieve deleted files from a MacBook Pro is to use the best Mac data recovery software.
|
|---|
Among other things, after reading this article, you will learn how you can gain access to that saved copy, and failing that, what are the other ways to retrieve deleted files from a MacBook Pro.
These “other ways” include things like having you retrieve deleted files from a MacBook Pro via:
An Old Backup,
From The Trash,
Directly From Your Hard Drive, Or,
By Using Software.
Read on to understand how to recover deleted files from a MacBook Pro.
Also Read: How to Recover Emptied Trash on Mac without Software?
Table Of Contents
In this article, you will learn:
- Is It Possible To Retrieve Deleted Files From A Macbook Pro?
- How To Recover Deleted Files From A MacBook Pro: Simple Fixes?
- Using Time Machine To Recover Files
- Try Dedicated Recovery Software
- Closing Notes

Is It Possible To Retrieve Deleted Files From A Macbook Pro?
The short version: yes it is, and depending on the situation, it is usually an amazingly painless process. It has happened to every single one of us at some point in time: accidental deletion of data. The problem is way more common than you may think, and the upside to this is that the solutions to this problem are also very common and easy to implement.
Luckily, the software designers at Apple Inc. have accounted for such a situation, and have designed macOS with this problem in mind.
You see, the way MacBooks work is this:
You delete a file > It is sent to the trash > If you delete it from the trash > A copy is saved locally to your MacBook >
This copy is not overwritten until much later, which means it is that much easier for you to retrieve deleted files from a MacBook Pro. As for the question of how to recover deleted files from a MacBook Pro, the next section outlines the steps you can take.
Also Read: Mac Documents Folder Emptied Suddenly – How to Recover Data?
How To Recover Deleted Files From A MacBook Pro: Simple Fixes?
Let us start with the basics of how to recover deleted files from a MacBook Pro. This section will teach you how to recover deleted files from MacBook Pro trash bins.
1. Use “Put Back”
If you have deleted the file from your MacBook Pro, but have not emptied the trash, then this fix is for you.

- Navigate to the Trash Bin Icon from your dock.
![]()
- Now, locate the file you want to be restored and drag and drop it onto the desktop or any other folder.
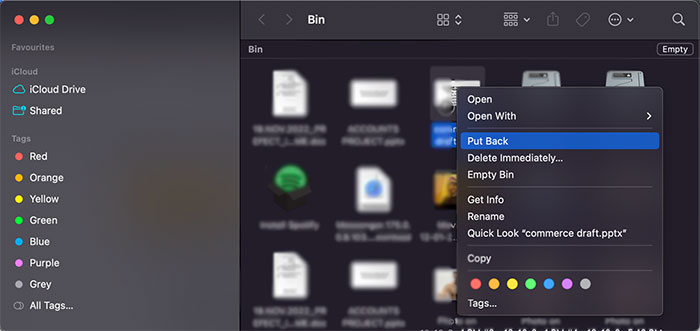
- Alternatively, you can also double-click the file in the trash and select “put back” from the drop-down list of options that appears.
2. Recover Files Deleted From External Storage
We are now faced with the question of how to recover deleted files from a MacBook Pro that were on an external device attached to the computer. You may have deleted files you need from externally attached storage, such as a pen drive or an external hard disk. You may notice that the files you have deleted are not in the trash bin, but you have not emptied the trash, so where did they go? MacOS will change the visibility of its files based on what devices are attached to the computer, and these visibility changes affect the trash bin as well.
Also Read: All about the New macOS Ventura: New features, compatibility
1. Plug the pen drive/ external hard disk/ other external media into the computer and then open the trash.
There is a good chance that your files will now be visible.
2. If they still aren’t, use a different port on your computer to connect the drive,
3. If your files still do not show up, enable “hidden folder viewing”.
You can enable hidden folder viewing by pressing “Command” =+ “Shift” + “.” [period/ dot].
These were the two ways that showed us how to recover deleted files from MacBook Pro trash bins, and can often be a lifesaver for many people.
Using Time Machine To Recover Files
When asking how to recover deleted files from a MacBook Pro, one of the easiest methods is to use macOS’ inbuilt tool, Time Machine.
You can find Time Machine through a spotlight search, or by browsing through utilities. Time Machine is a utility application that is Native to macOS, and once it has been configured, it automatically creates backup(s) of your files and folders, making them available for easy restoration should the need ever arise.
Also Read: Top 10 Data Recovery Software for Mac [2022]
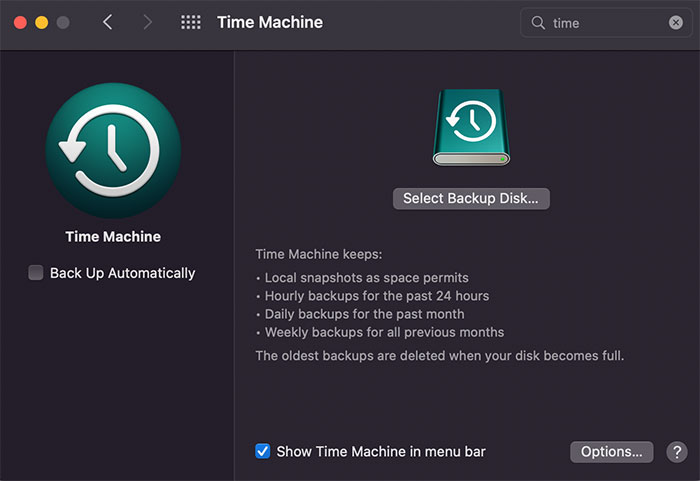
1. Configure Time Machine On macOS:
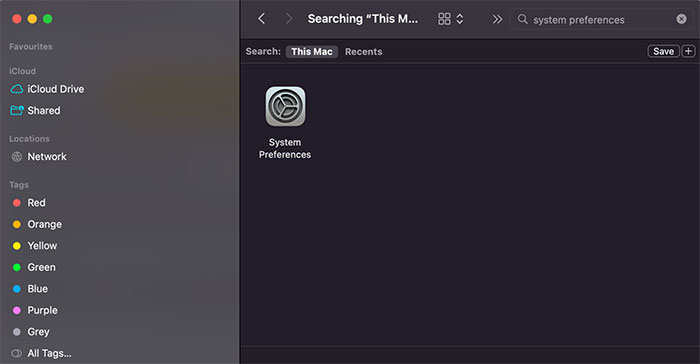
Navigate to “System Preferences”, and then choose “Time Machine”.
Now, click on the “Select Disk” button, and choose the storage device you want the backups to be created on/ written to.
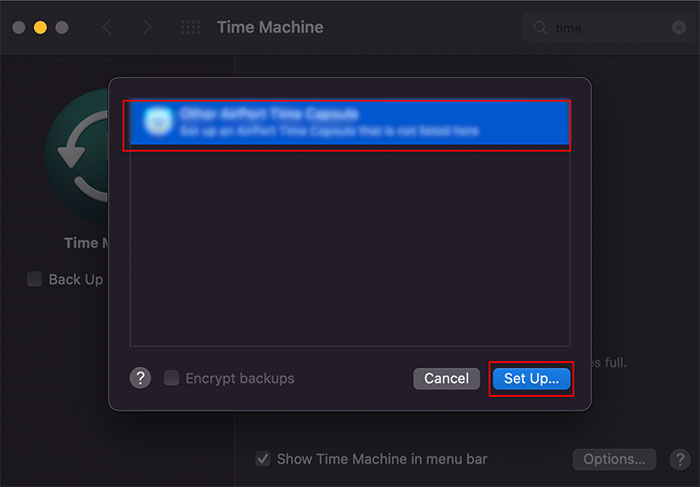
Note: You can even have external storage devices as your backup disks, but you need to leave these connected to your Mac if you choose to do so. Now, all that is left to do is specify how often you want your Mac to create backups for you. When that is done, you will have successfully configured macOS’s Time Machine utility, and are on your way to retrieve deleted files from a MacBook Pro.
2. Recover The File Using a Time Machine:
Now, if you have not configured the time machine before you deleted the file, then this entire process is redundant. However, the good news is that Time Machine has probably been enabled for your device if you use a work or school device, by the system administrator, or IT department.
To recover the file(s) you need, simply open Time Machine (Via Spotlight or the menu bar). Now, navigate to the date that you are looking for (The time machine works on a linear date line). Open the deleted files in the backups created by Time Machine, and restore the file(s) from there
Try Dedicated Recovery Software:
If the above methods cannot show you how to recover deleted files from a MacBook Pro, then you still have a hail-mary solution left: using dedicated, purpose-built data recovery software. Stellar Data Recovery For Mac will even show you how to recover permanently deleted files from a MacBook Pro because everything is relative, even the word “permanent”.

Download and install Stellar Data Recovery For Mac, and give the application access to your hard drive.

You can use the demo version to scan and check whether or not your files are still recoverable.
Also Read: How to Get Activation Key of Stellar Data Recovery for Mac?
If they are, then you can assuredly purchase a license to use the full version of Stellar Data Recovery For Mac and proceed to retrieve deleted files from a MacBook Pro.
The best part about it is that generational compatibility should not be an issue because Stellar Data Recovery for Mac is designed to work with M1, M2, and even T2 chipset-equipped Macs.
Also Read: Free Data Recovery Tools from Stellar
Stellar Vs. The Competition: Why Us
Stellar has over two and a half decades of industry experience when it comes to both data deletion and data recovery.
This experience gives us the know-how of how data works, and how machines store it, enabling us to successfully recover your vital data. Stellar is used by millions of people worldwide, across 190+ countries, and even governments have chosen to partner with us for their data recovery needs (Our latest client is none other than the government of India).
We’ll end by saying that just because you deleted a file, doesn’t mean that it cannot still be accessed, which is where tools like Stellar Data Recovery For Mac come in.
About The Author

Vandita Jain is a Technology Writer at Stellar. She is a tech enthusiast with over two years of experience in the Data Recovery domain. Vandita loves researching and providing DIY solutions, tips, and tricks to solve Windows technical issues. She is also an avid learner, constantly exploring the latest advancements in technology. Besides, she enjoys traveling and trekking.