Stellar Data Recovery Software
Complete Guide to Move Windows to Another Drive or SSD
-
Written By Vandita Jain
-
 Updated on April 24, 2024
 -
 Min Reading 10 Min
 - Share

| Summary: To move Windows 11 to another drive is easy when done step by step. It is a simple, three-step process that can be done in under an hour. Also, remember to back up any important data beforehand. If you do happen to lose data, do not attempt to DIY anything – you’ll just make the problem worse. Use professional tools like Stellar Data Recovery Software to regain your data.
|
|---|
Migrate Windows 11 to a New Hard Drive or SSD
If you want to migrate Windows 11 to a new hard drive or SSD – you are in the right place.
You may want to change your computer’s drive for different reasons. The main reason is usually because your computer is slow. Older computers often have HDDs or hard disk drives.
As HDDs get old, they work slower. This can slow your computer, especially if the HDD is where your operating system is. The drive where the operating system is stored is called the “boot drive.”
When you move Windows to another drive, preferably a solid-state drive or SSD, you will find that your performance increases exponentially.

Table of Content:
- Prerequisites to Move Windows to Another Drive
- Method 1: Clone your boot drive with a system image
- Method 2: Use Stellar Data Recovery Professional to clone your drive
- What should you do if you lose data during the transfer?
Prerequisites to Move Windows to Another Drive
How to move Windows from an HDD to an SSD, you ask. The answer is simple – copy the entire drive, Windows, files, and all to a new SSD. This process is called “cloning”.
We will show you two cloning methods to move Windows 11 to another drive. Each of these has certain requirements.
| Method | Requirements | Time Taken |
|---|---|---|
| Clone Boot Drive | 1x External Hard Drive, 1x Pen Drive | 30 – 45 minutes |
| Using Software | Stellar Data Recovery Software (or similar) | 15 minutes |
Important: For both methods, we assume that you have already installed your new hard drive or SSD inside your computer and that it is working.
In our example, we will migrate Windows 10 to an SSD. Still, this guide will work for all use cases:
- You want to migrate Windows 11 to a new hard drive
- You want to migrate Windows 10 to a new hard drive
- You want to migrate Windows 10 to an SSD
- You want to migrate Windows 11 to an SSD
The type of drives you are transferring between doesn’t matter either.
You can go from an HDD to an SSD, from an SSD to an NVME, or from an HDD to an NVME, etc.
Basically, if you want to move Windows to another drive, either method will work. Choose whichever seems easier to you.
Method 1: Clone your boot drive with a system image
Now, your computer may have multiple drives in it. However, only one of these will have Windows installed on it (this is called your “boot drive”).
To move Windows to another drive, you must clone your boot drive onto the new target hard drive or SSD.
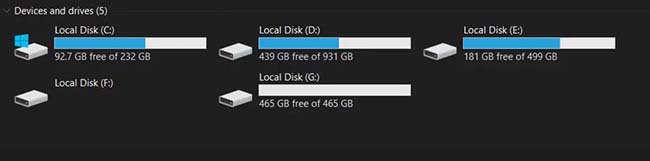
If you have multiple drives, how do you know which drive has Windows on it? It’s simple – just open your File Explorer.
The drive that houses your Windows installation will have the Windows logo next to it.
On our computer, this is the C drive, as seen in the image below.
This method has three broad steps, each of which will be explained in detail.
At a glance, the three steps in method 1 are:
- Step 1: Creating A System Image – an exact copy of the drive that has Windows on it.
- Step 2: Create A Windows Installation USB – a special USB that (among other things) allows us to restore system images.
- Step 3: Restore The System Image – using that Windows USB, copy the system image to a new hard drive or SSD.
Let us begin.
Step 1: Create A System Image Of Your Windows Drive
To move Windows to another drive, you first need to create what is known as a “system image.” Here’s how to do it.
1. Connect the external hard disk to your PC.
2. Click the Windows key and type in “File History” as shown below.
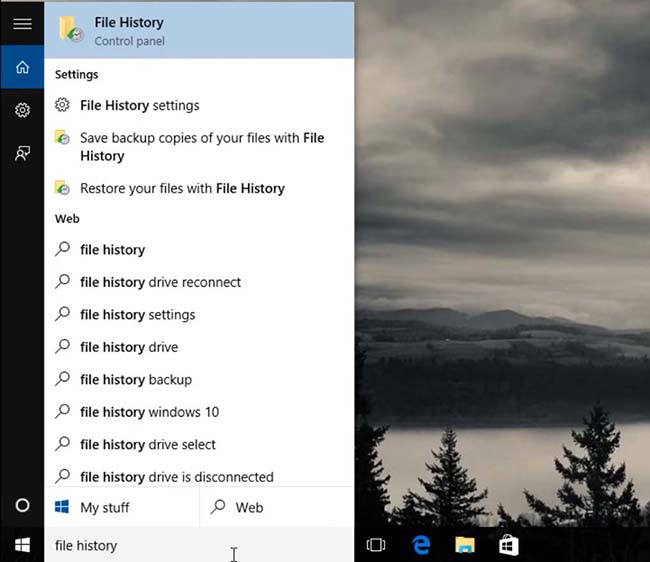
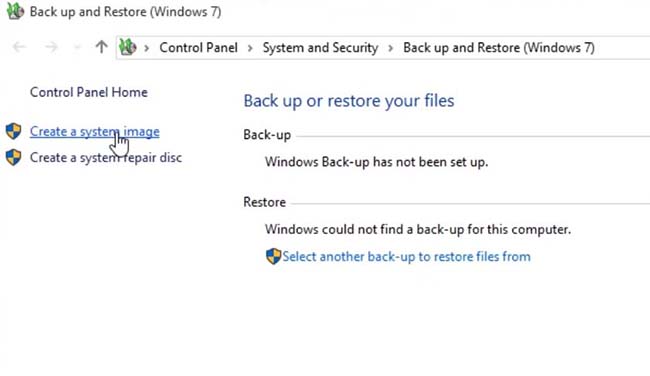
3. You will see the Window pictured below. In the bottom left-hand corner, click “System Image Backup”.

4. You will then click on “Create a System Image”.
Also, even though the pop-up says “Windows 7”, this is due to a registry overwrite and is nothing to be concerned about.
The “Create A System Image” option can be found in the top-left corner, as shown below.
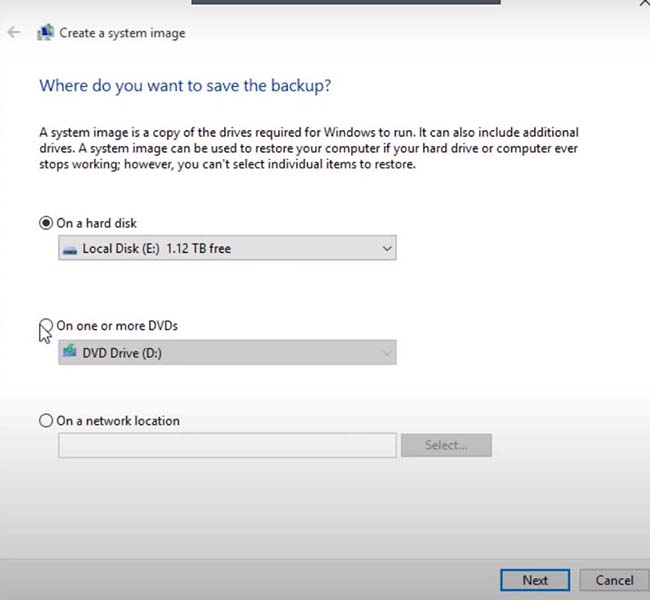
5. Choose “On A Hard Drive”, then select your external drive, and click “Next”.
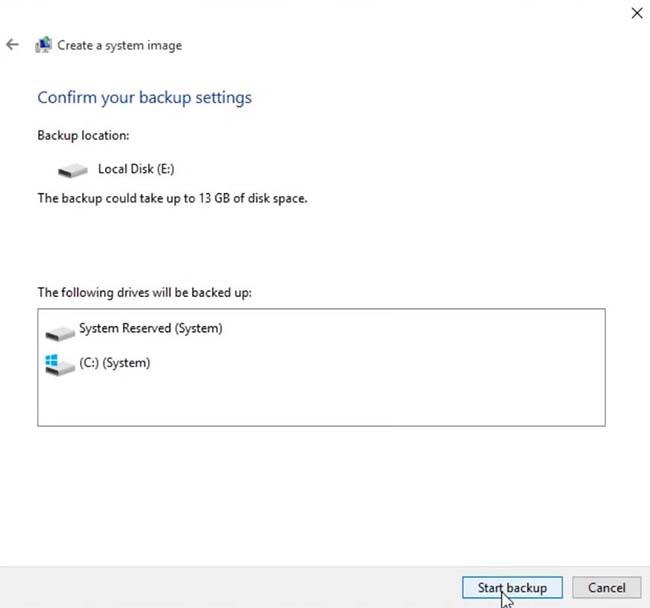
6. Click on “Start backup.”
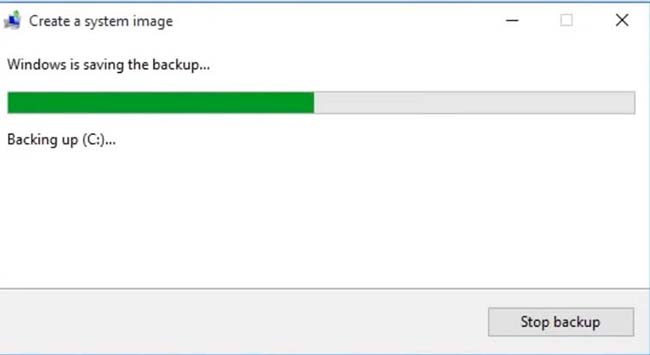
7. Wait for the process to complete.
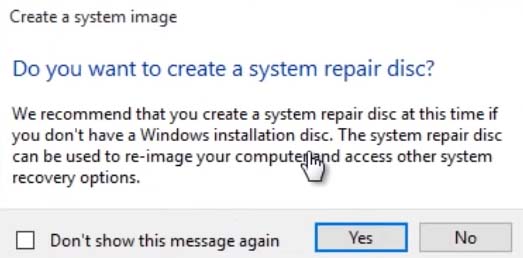
8. In the pop-up that appears, click “Yes.”
This will be a fallback in case your Windows installation USB does not work.
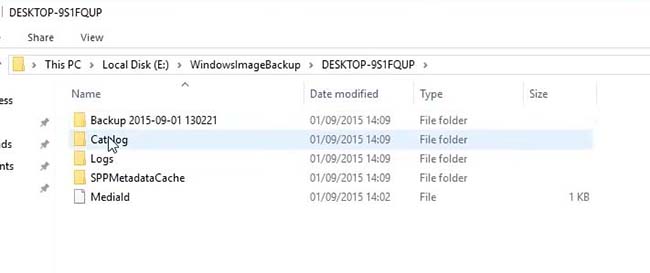
9. You will get the following message when the process is complete.

You can verify that the system image has been created by checking whether a folder named “WindowsImageBackup” has been created on your external hard drive or not. It will look like this:
Step 2: Create A Windows Installation USB
What we have just done is create an exact replica of your current boot drive. We will later transfer this replica onto your new hard drive or SSD.
To do that, we need to create a Windows installation USB. Here’s how to do it.
1. Connect your USB drive to the computer.
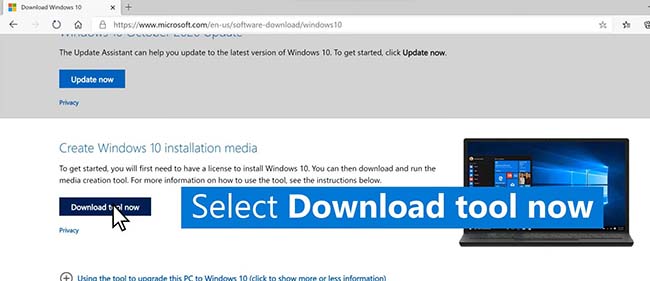
2. Go to aka.ms/windows10
3. Click the “Download Tool Now” button, as shown below.
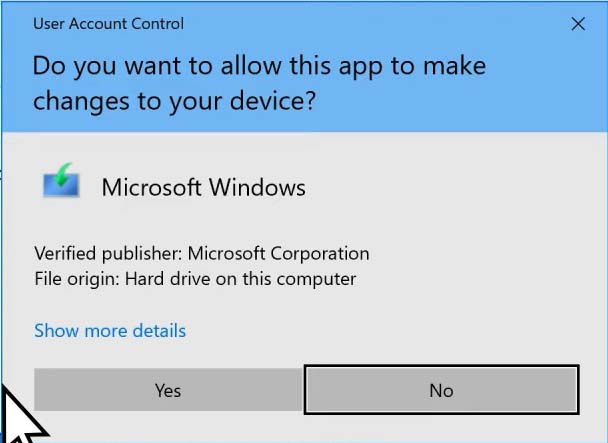
4. Double-click the file when it downloads to run it. If you get the “allow changes” prompt, click “Yes” as shown below.
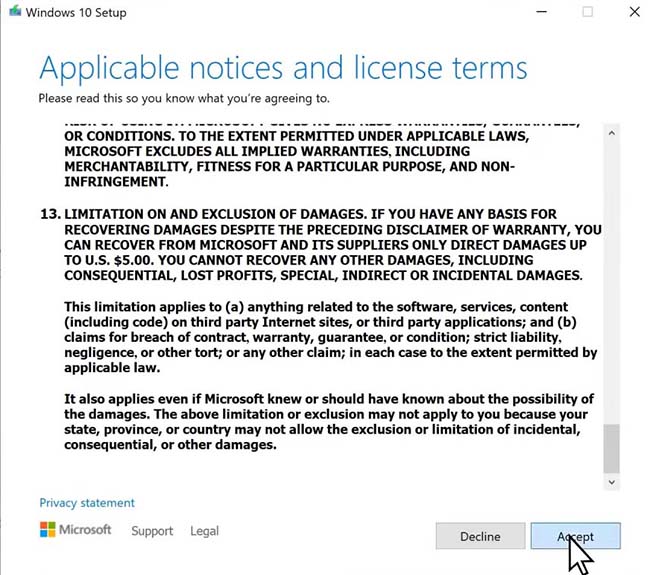
5. Accept the terms of the licensing agreement.
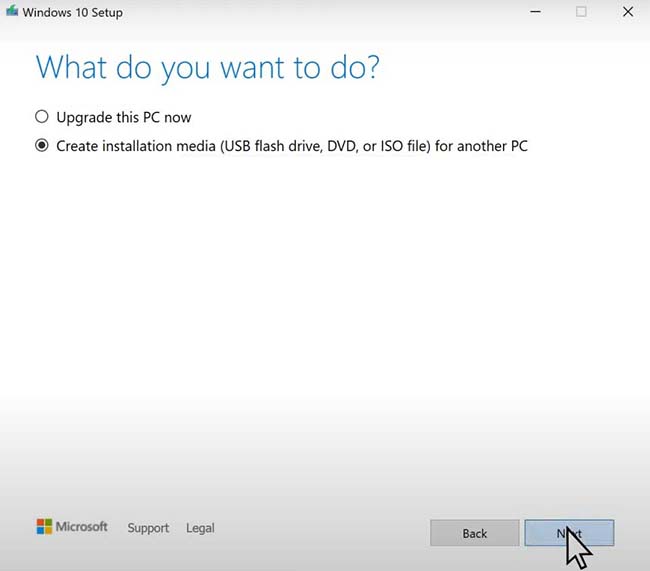
6. Choose the “Create Installation Media” option, and then hit “Next”.
7. Check the “Use the recommended options for this PC” option, and then hit “next”.

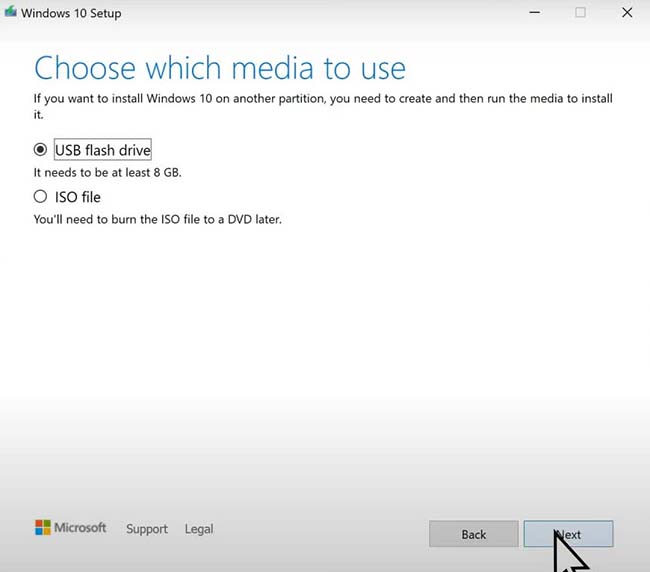
8. Select the “USB flash drive” option and hit “Next”.
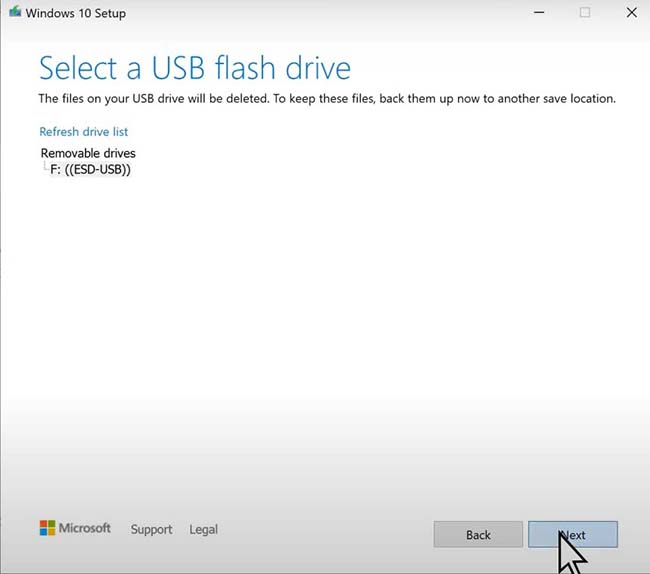
9. Choose the USB drive (if there is more than one connected) and hit “Next”.
10. Let the process complete. When it finishes, you will have created a Windows installation USB.
Also Read: How to Fix SSD is Not Showing in BIOS?
Step 3: Restore The System Image On Your New Hard Drive Or SSD
So far, we have made a replica of the drive that has Windows on it and a special Windows USB.
We must copy this replica to your new hard drive or SSD to move Windows to another drive.
To do this, we need to enter the BIOS and change the order of the bootloader. The “bootloader” is software that runs when you start your computer.
It’s responsible for loading the operating system from the computer’s storage (like a hard drive). If multiple drives are connected, the bootloader decides which one to boot from.
Now, by default, your computer will boot from the drive that has Windows on it.
However, we need to boot from that special USB we created, not the Windows drive.
Here’s how to do that.
- Leave the external hard drive and pen drive connected to your computer and restart it.
- Enter the BIOS. Each computer manufacturer has a specific key that you need to press during a restart to enter the BIOS.
| Brand | BIOS Hotkey |
|---|---|
| Asus | F2 or DEL (Press Once After Logo Shows) |
| Lenovo | F1 or F2 (Press Once After Logo Shows) |
| Dell | F2 (Keep Pressed After Logo Shows) |
| HP | F10 (Repeatedly Press Immediately After Restart) |
| MSI | DELETE (Press Once After Logo Shows) |
| Acer | F2 (Press Once After Logo Shows) |
| Microsoft Surface | Volume Up (Keep Pressed) + Power (Click Once) |
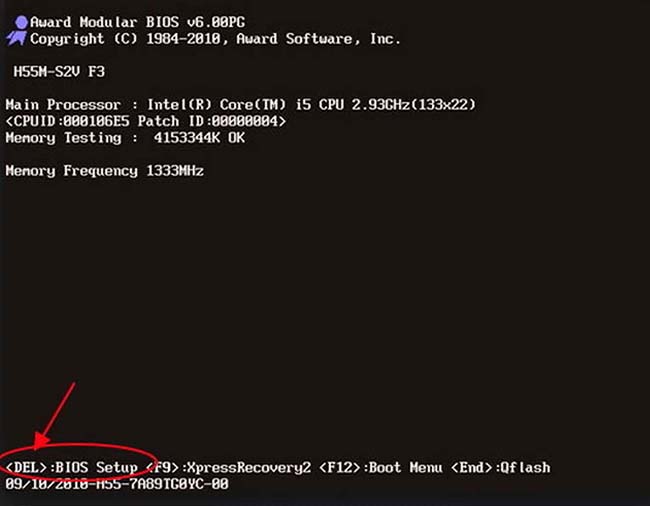
In our case, we must press the DEL key to enter the BIOS, as seen below.
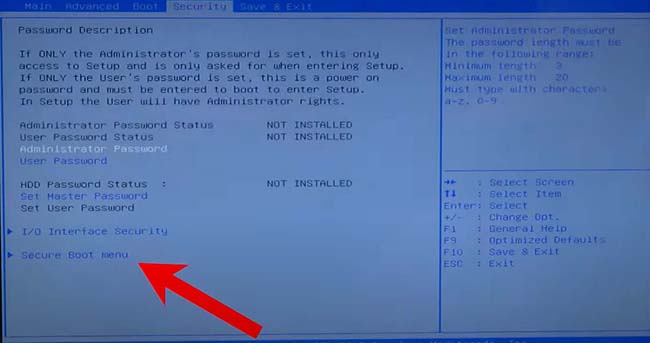
- Every boot menu looks slightly different. In our case (Asus), we navigate to the “Security” tab and go to the “Secure Boot Menu”. Look around in the BIOS for something like “Bootloader”, “Boot Order”, “Boot Menu” or something similar.
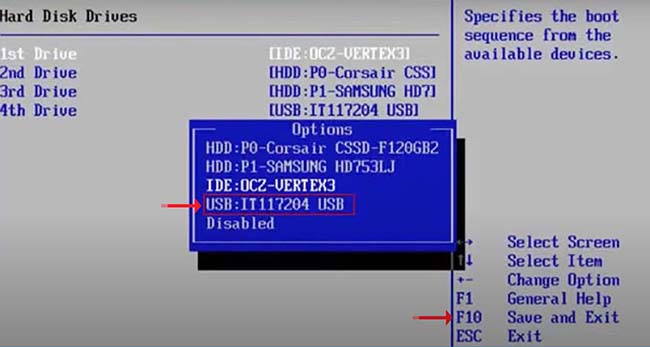
- Next, select your USD drive, as shown below. Again, the interface may look different for you, but what matters is that in the boot menu, you select your USB drive. Save your changes and exit.
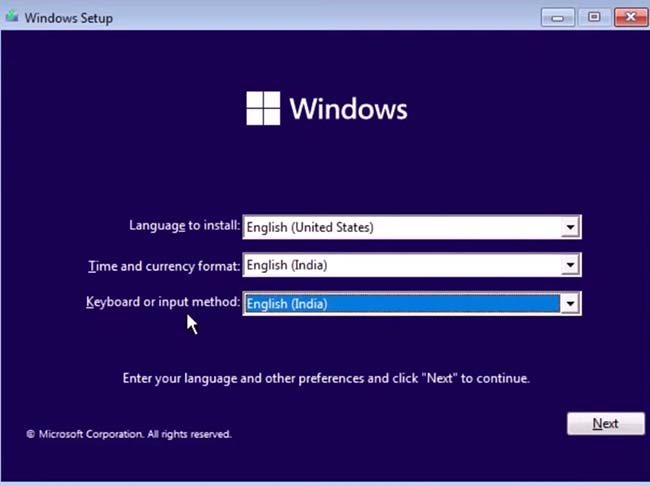
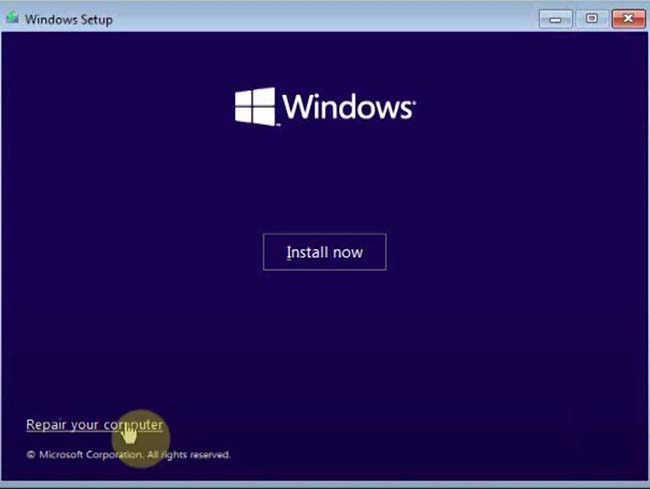
- Now, you will see the Windows setup screen. It is pictured in the image below. Select your language, time, and input method. Click on “Next.”
- Next, click on “Repair your computer.”
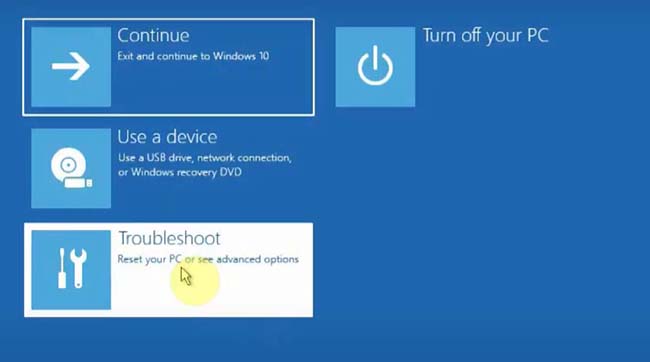
- Click on “Troubleshoot”.
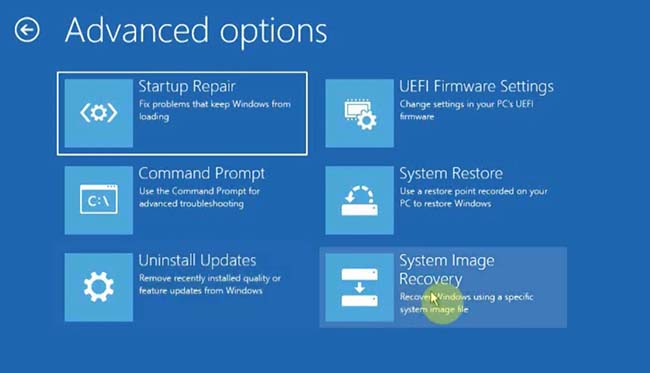
- Click on “System Image Recovery,” then click on “Windows 10” or Windows 11, as applicable.
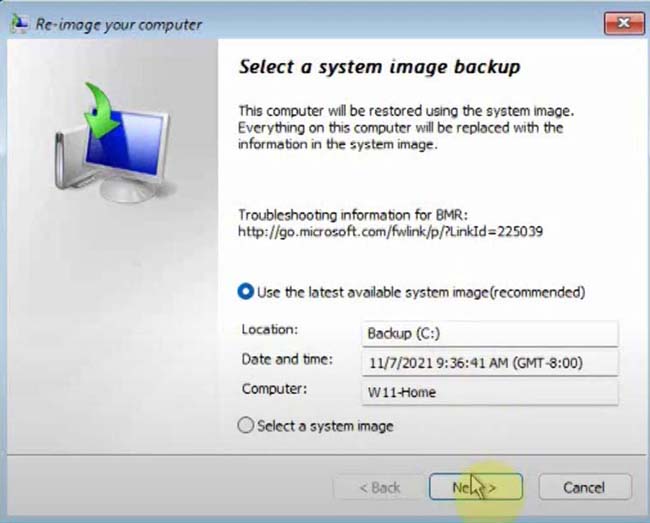
- Click On “Use The Latest Available System Image”, and then click “Next” as shown below.
If there are multiple drives in your computer, you will get a prompt.
In this prompt, select the destination drive (select your target HDD or SSD).
- Click on “Finish” and then click on “Yes” in the pop-up dialog box. When the process is complete, unplug your USB drive and click “Restart Now”.
When the process completes, will have successfully been able to move Windows to another drive.
You can now safely format your old drive (the one you cloned) and free up that space for other use.
Method 2: Use Stellar Data Recovery Professional to clone your drive
This method uses an inbuilt function of Stellar Data Recovery software to clone your drive.
It is much like the process above but with far fewer steps.
Here’s how to do it.
- Download and install Stellar Data Recovery Professional (it’s free).

- Click on the nine dots in the top-right and select “Monitor Drive.” This will open up the Stellar Drive Monitor.
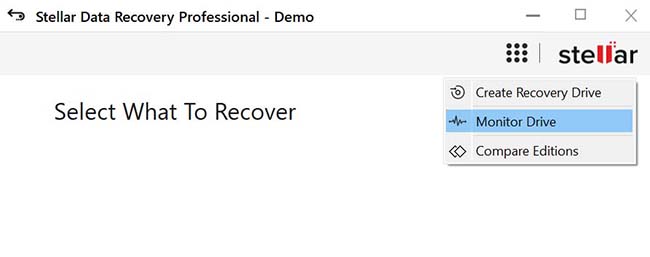
- In the drive monitor, click on “Clone Drive”, the last option in the menu pane on the left.
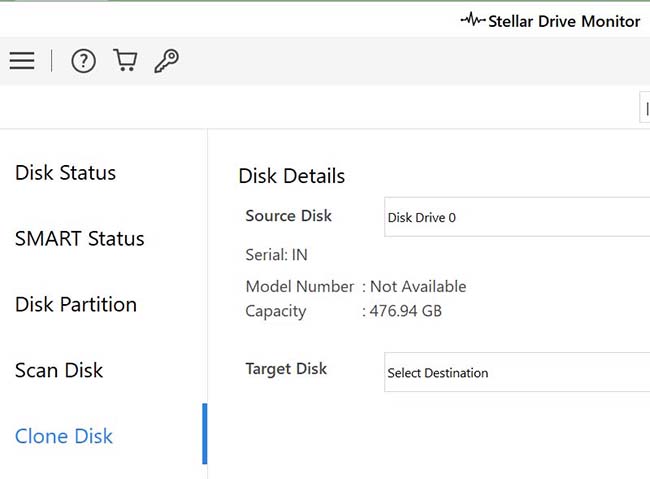
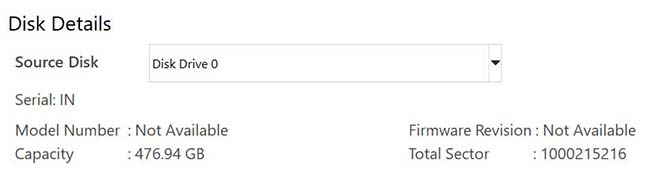
- First, select the “Source Disk” – the one you want to clone (in this case, your boot drive).
- Then, select your “Target Disk” – where you want to clone your drive, the destination.

- Click on “Clone” – and wait for the process to complete. You will get the following message when it is done.
Format your old drive, and you’re good to go – you have managed to move Windows to another drive.
Also Read: The Computer Won’t Wake Up From Sleep on Windows 11: How to Fix the Issue?
What should you do if you lose data during the transfer?
We’ve answered the question of how to move Windows from an HDD to an SSD (or other drive).
As you have seen, it can be a complicated process, and success has a lot of variables.
It is rare, but not unheard of to lose data during the drive-cloning process.
Some of the most common triggers for data loss are:
- A power outage during the cloning process.
- Bad sectors developing on your old drive during the migration.
- A mismatch between the old and new drive formats (exFAT, FAT32, etc)
- Fluctuating voltages during the cloning process (affects hard drives)
- Malware that causes system files to go missing.
Also Read: ExFAT vs NTFS vs FAT32 – A Detailed Comparison of Key File Systems
Of course, there could be other causes, but these five seem to be the most rampant.
Now, we are very pro-DIY fixes, but in this case, we have to advise against them. Fiddling around with your hard drive can result in irreparable data loss.
That is why you’d want to use particular tools, such as Stellar Data Recovery Software.
Read: How to Evaluate Free Data Recovery Software for Windows 11?
Every week, our tools allow hundreds of customers to recover data caused by various problems.
Stellar Data Recovery software can regain data lost due to corruption, malware, and everything in between.
Our data recovery software is 100% free to download and use; no card required. Also, you can preview all files that our software can recover with no hidden surprises.
Also Read: Get Stellar Data Recovery Activation Key
FAQs
1. Do I have to format my old Windows drive after the cloning process?
Yes – otherwise, you may run into what is called a “Boot Drive Conflict”. This will most likely result in a BSOD (Blue Screen Of Death) error, rendering your computer unstable till formatted.
2. I finished the cloning, but Windows still is not booting. What should I do?
You have probably left the Windows USB Installation Media attached to your computer. Disconnect the external hard drive and the USB drive, and try restarting. If the problem still persists, go to the BIOS again and boot from your new drive manually. You’d only have to do that manual boot once.
Also Read: How to Fix Windows Boot Error 0xc0000098?
3. I used Stellar Data Recovery Software to clone my drive, but Windows is not booting. What should I do?
In this case, remove your old hard drive from the computer and then restart the computer. Once you have booted into Windows, reconnect your old drive and format it, then mount it using the Disk Manager.
Also Read: Windows 10 Won’t Boot on My PC
4. Do I need to download additional software if I lose data?
No – the Stellar Data Recovery Software that you used to clone your hard drive has all the tools needed to recover your data. You can use it to preview all recoverable data completely free of charge. Download Free Data Recovery Software Full Version
5. Can this process be used to upgrade from Windows 10 to Windows 11 during the migration?
No, this process is for migrating your existing Windows installation. Upgrading the Windows version requires a different procedure.
About The Author

Vandita Jain is a Technology Writer at Stellar. She is a tech enthusiast with over two years of experience in the Data Recovery domain. Vandita loves researching and providing DIY solutions, tips, and tricks to solve Windows technical issues. She is also an avid learner, constantly exploring the latest advancements in technology. Besides, she enjoys traveling and trekking.