Stellar Data Recovery Software
How to Fix Error 0xC1900101 on Windows 11?
-
Written By Vandita Jain
-
 Updated on April 24, 2024
 -
 Min Reading 8 Min
 - Share

| Summary: There are many variations of the 0xC1900101 error message, each with a different solution. However, the easiest way to fix all of them is to reinstall a fresh copy of Windows. And data loss because of a 0xC1900101 error is rare, but not unheard of. In this case, you can recover your data using Stellar Data Recovery software.
|
|---|

Are you facing the 0xC1900101 error while updating to Windows 11?
This common issue can be a roadblock in experiencing the latest features of Windows 11.
In this article, we’ll guide you through simple, easy-to-follow steps on how to fix the 0xC1900101 error.
Even though the 0xC1900101 error causes a BSOD (Blue Screen of Death), it is nothing to worry about.
The fixes are simple, and can be done without prior technical knowledge.

Table of Content:
- What is the 0xC1900101 error?
- Types of the 0xC1900101 error
- How to fix Error 0xC1900101 on Windows 11?
- What if you lose data after the 0xC1900101 error?
What is the 0xC1900101 error?
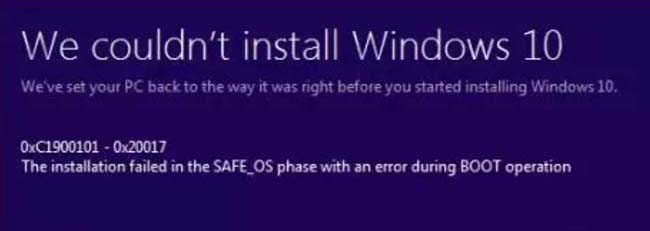
The 0xC1900101 error is an error that only happens during a Windows update, or when upgrading to Windows 11.
Here’s what the error code might look like.

Or
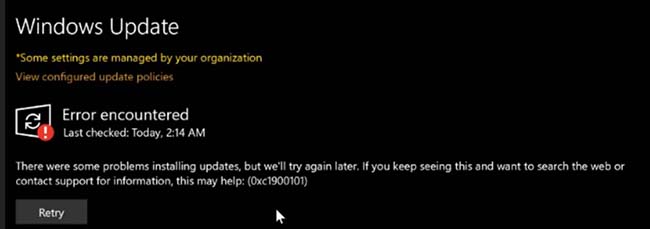
The 0xC1900101 error code signals a problem that is preventing the update from completing successfully.
Primarily, the 0xC1900101 error is associated with driver-related issues.
It can occur due to outdated/ duplicated drivers, incompatible hardware, or even conflicts with certain software (like installed apps).
Additionally, insufficient system resources like storage space can also lead to the 0xC1900101 error.
Also Read: How to Fix the Windows Update Error 0x80070002?
Types of the 0xC1900101 error
There are several types of the 0xC1900101 error, all of them related to driver issues. Each has its own specific fix, recommended by Microsoft themselves.
Here are the five most common types of the 0xC1900101 error, and their related causes.
|
Error Code |
Cause (Stated by Microsoft) |
|
0xC1900101 – 0x2000c |
Out-of-date drivers, error during the “Wim apply” process. |
|
0xC1900101 – 0x20017 |
A driver somewhere has caused a SafeOS boot failure. |
|
0xC1900101 – 0x30018 |
A driver somewhere is not working with a setup.exe file. |
|
0xC1900101 – 0x3000D |
A display driver has failed during the 1st MIGRATE_DATA phase. |
|
0xC1900101 – 0x4000D |
A display driver has failed during the 2nd MIGRATE_DATA phase. |
|
0xC1900101 – 0x40017 |
A faulty driver has caused the Windows 10 upgrade to fail. |
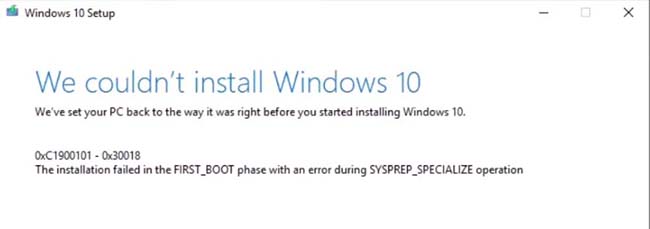
Here’s another example of the same error message, but for Windows 10.
Next, we will show you how to fix the 0xC1900101 error, and all of the variations we listed above.
Also Read: The Computer Won’t Wake Up From Sleep on Windows 11: How to Fix the Issue?
How to fix Error 0xC1900101 on Windows 11?
1. Fix 0xC1900101 – 0x2000c/ 0x30018 — Disconnect all peripheral devices
The 0xC1900101 – 0x2000c error code is caused when the Windows setup wizard gets an unspecified error.
It shows up during the “WinPE phase”, which is when the setup wizard is testing driver compatibility.
To fix this error, and the 0xC1900101 – 0x30018 error as well, Microsoft recommends the following things:
1. Disconnect all peripheral devices from your system. This means everything, except your mouse, keyboard, and display.
2. Restart your computer (with the peripheral devices still disconnected).
3. Begin the Windows upgrade/ update process again.
Also Read: Windows Update Error 0x80240017
4. When setting up the Windows setup wizard, make sure that the “Download & Install Updates (Recommended)” box is ticked.
This should fix both the 0xC1900101 – 0x2000c and the 0xC1900101 – 0x30018 error message.
Also Read: How to Fix Blank White Screen of Death on Windows 11/10?
2. Fix 0xC1900101 – 0x20017 — Update the problematic driver(s)
Next up is the 0xC1900101 – 0x20017 error message.
This one is caused when Windows cannot transport a certain driver from the old Windows to the new version.
In turn, this results in a “rollback” of the operating system to the previous version. And the rollback in turn causes a SafeOS boot failure.
Note: Only for this particular 0xC1900101 version, the cause can also be hardware related.
To fix this 0xC1900101 variant, Microsoft recommends the following steps:
1. First, update all your drivers.
2. Open the start menu, and type in “%windir%\Panther” without the quotes. Hit enter.
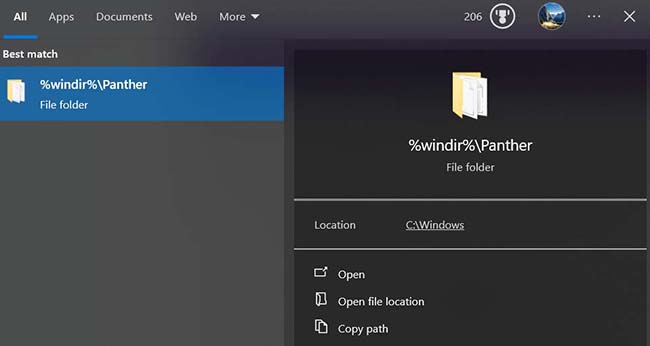
3. There, locate the Setuperr.log and the Setupact.log files within this folder.
4. You will need to provide an administrator password to open these files.
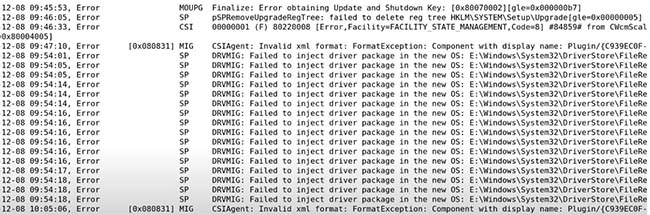
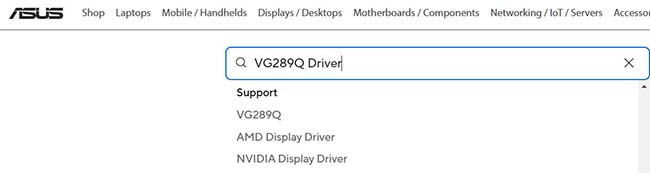
5. Within these files, locate the drivers that have caused a problem. They will be listed, and their file location will be given. In the below example, the location of the problem driver is in E drive > Windows > System 32 > DriverStore.
6. Go to the source website of these drivers, and download the latest version. Alternatively, an SFC scan can fix any driver issues if the file location is in the “System32” folder.
7. Restart your computer.
These steps will fix the 0xC1900101 – 0x20017 error variant.
Also Read: Windows 11 March 2023 Update Issues: (KB5023706)
3. Fix 0xC1900101 – 0x3000D — Manually install your display drivers
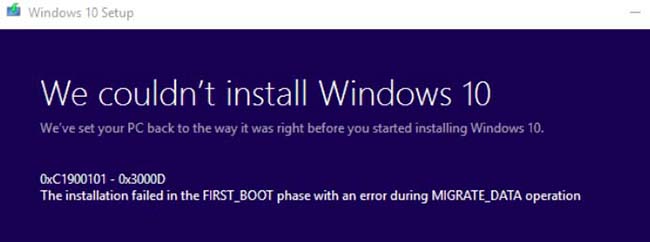
Now, the 0xc1900101 – 0x3000D error is caused when the display driver fails during the FIRST_BOOT operation when migrating data.
To fix the 0xC1900101 – 0x3000D error, Microsoft says to update your display driver.
Here’s how to do that.
If using an external monitor, with a laptop:
1. Disconnect the external monitor.
2. Restart your computer.
3. Restart the upgrade/ update process.
If using an external monitor, with a PC:
1. First, go to the manufacturer of your monitor.
2. Type in “the model name of your monitor” + “driver”.
3. Download the latest driver that was published, and install it.

4. Restart your computer.
5. Restart the upgrade/ update process.
If that doesn’t work, follow the steps below in the “if using a laptop” section.
If using a laptop:
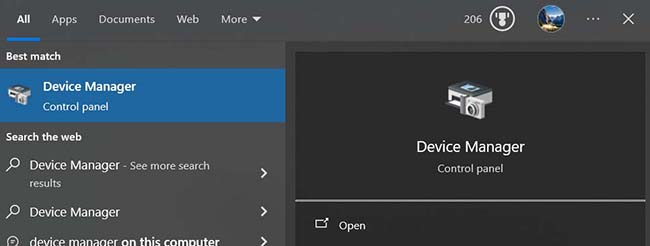
1. Hit the Windows key and type in “Device Manager”. Hit enter.
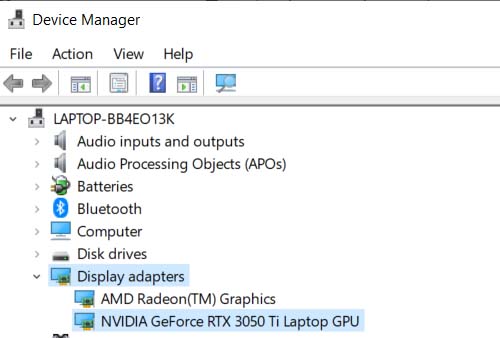
2. Scroll down and look for “Display adapters” and expand the list.
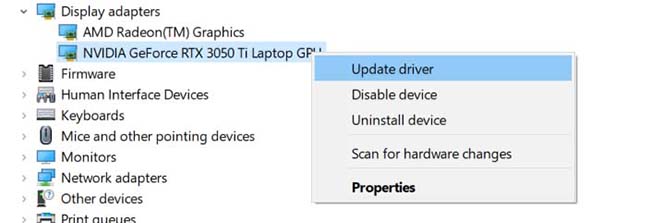
3. There, right click any item in the list, and select “update driver”.
4. In the pop-up dialog box, select “Search automatically for drivers”.
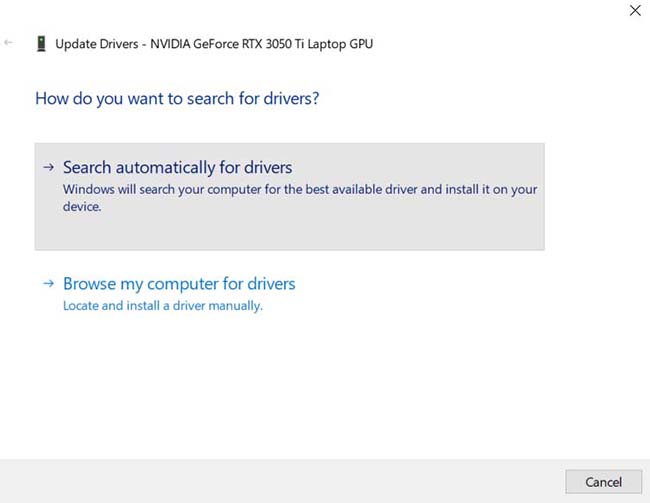
5. Repeat this process for all items in the expanded list under “Display Adapters”.
6. Next, scroll down and look for “Monitors” in the Device Manager.
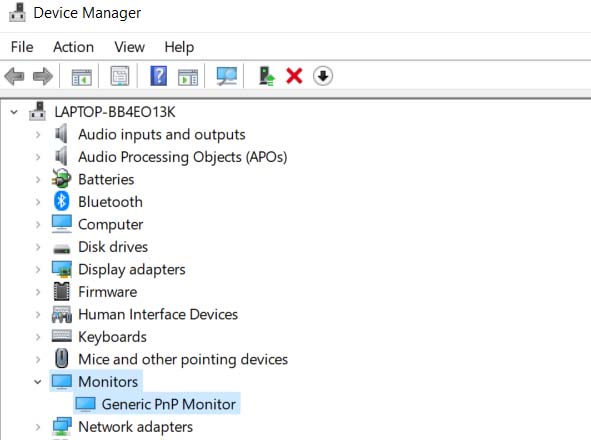
7. Expand the list, and repeat steps 3 and 4.
8. Restart your computer.
9. Restart the upgrade/ update process.
4. Fix 0xC1900101 – 0x4000D — Run an SFC Scan
Similar to the 0x3000D error above, the 0xC1900101 – 0x4000D error is caused when a driver fails during data migration.
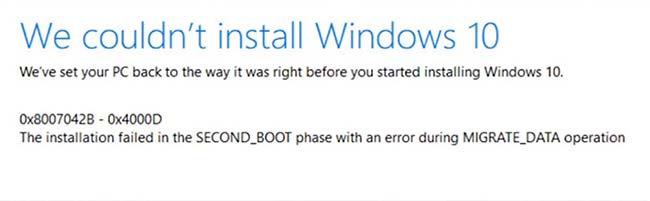
A driver failure during the SECOND_BOOT results in a rollback to a previous version of Windows. As a result, the update/ upgrade process fails altogether.
For a fix, Microsoft says to locate and disable the driver that is causing the rollback.
Now, only Windows (essential) drivers can cause the 0x4000D error, so an SFC scan should fix it.
The system file checker (SFC) scans and replaces/ repairs all missing and damaged essential windows system files.
Here’s how to do it.
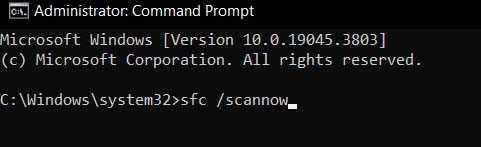
1. Open the command prompt as an administrator.
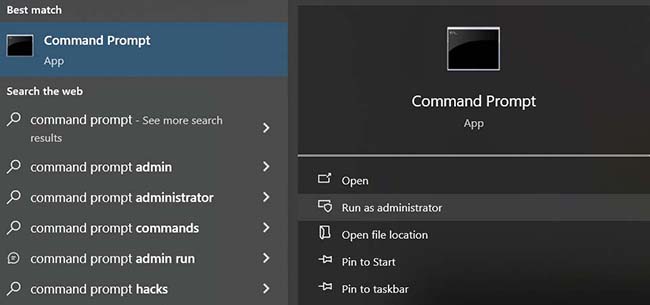
2. If prompted, enter the password to an administrator account on the system.
3. Type in “sfc /scannow” without the quotation marks and hit enter.
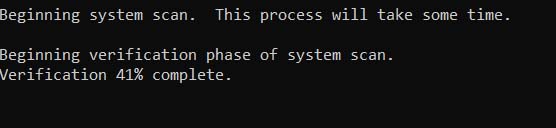
4. Wait for the scan to complete. You will see how much of it is completed through a progress indicator, as shown below.
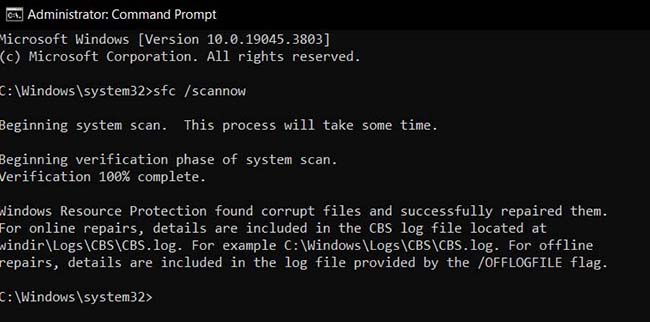
5. When finished, you will get a notification message as shown below.
6. Restart your computer.
These steps will help you resolve the 0xC1900101 – 0x4000D error message.
5. Fix 0xC1900101 – 0x40017 — Install a fresh copy of Windows (it’s free)
Lastly, we have the 0xC1900101 – 0x40017 variant of the 0xC1900101 message. This is a 0xC1900101 Windows 10 error.
All the other error variants before this one could also happen on windows 11. However, the 0x40017 variant is purely a 0xC1900101 Windows 10 error.
This one happens when the entire upgrade/ update process goes off without a hitch, but at the last second, a driver stops the process.
The only way to fix the 0xC1900101 error message — perform a fresh install of Windows 10.
Here’s what you’ll need:
- A stable internet connection
- A USB drive with at least 8 GB of storage space
This official Microsoft article teaches you how to download and use the Windows 10 Installation Media tool.
What if you lose data after the 0xC1900101 error?
Now, encountering the 0xC1900101 error during a Windows update or upgrade can sometimes lead to data loss.
This can happen especially if the update process is interrupted or fails.
If you find yourself in this situation, don’t worry. There are ways to recover your lost data.
One effective solution is to use reliable data recovery tools, like Stellar Data Recovery software- Download Free Data Recovery Software Full Version
Thousands of people around the world use our software to recover their data each week.
Our software is designed to recover lost or deleted data under various scenarios, and this includes system crashes and update failures.
Also Read: Windows 11 PC Keeps Crashing
Stellar Data Recovery software can recover a wide range of file types, including documents, photos, videos, and more.
Our tools also support recovery from hard drives, SSDs, USB drives, and other storage media.
Lastly, Stellar Data Recovery is known for its user-friendly interface, with no technical skills required.
Here’s all you need to know about using Stellar Data Recovery.
Also Read: How to Get Stellar Data Recovery Activation Key?
Frequently Asked Questions
1. How long does it typically take to fix the 0xC1900101 error?
The time to fix the error varies depending on the method used. Simple fixes like disconnecting peripherals can be quick, while a fresh Windows install will take longer.
Also Read: Best Methods to Find Lost or Missing Files on Windows 10/11
2. Can antivirus software cause the 0xC1900101 error during Windows 11 update?
Yes, sometimes antivirus software can interfere with the update process. Temporarily disabling it during the update might help.
3. Will I lose my personal files while fixing the 0xC1900101 error?
Most fixes for the 0xC1900101 error don’t involve data loss. However, installing a fresh copy of Windows might require backing up your files first. If you do choose to install a fresh copy of Windows, you will also lose your System Restore images, so bear that in mind.
Also Read: How to fix ‘Unexpected Error: Changes to Data Can’t Be Saved” in Windows 11?
4. If I encounter the 0xC1900101 error, should I stop future Windows updates?
No, avoiding updates can leave your system vulnerable. It’s better to resolve the error and keep your system up to date for security and performance.
Also Read: How to Fix Windows Update Error 0x800700d8?
5. If I repeatedly encounter the 0xC1900101 error, could it indicate a hardware issue?
Persistent occurrence of this error could indicate a deeper hardware compatibility issue. Consider consulting with a professional or your device manufacturer.
About The Author

Vandita Jain is a Technology Writer at Stellar. She is a tech enthusiast with over two years of experience in the Data Recovery domain. Vandita loves researching and providing DIY solutions, tips, and tricks to solve Windows technical issues. She is also an avid learner, constantly exploring the latest advancements in technology. Besides, she enjoys traveling and trekking.