Boot Device Missing Error: Quick Rescue Guide
Try the quick fixes first before diving into the advanced troubleshooting steps given in this article.
- Quick fix #1: Check if your SSD/HDD appears in BIOS/UEFI—if it’s not listed, the problem is hardware or a loose cable, not Windows.
- Quick fix #2: Incorrect boot order is a common cause and can be fixed easily. In BIOS settings, move “Windows Boot Manager” (or your drive’s name) to the top of the boot list, save, and restart.
- Quick fix #3: Reseat or replace the SATA/NVMe connector—one loose plug is enough to make a perfectly healthy drive vanish.
Follow Advice #1 if you resolve the boot device missing error using these quick fixes, and Advice #2 if none of the 7 methods given in the article work for you.
- Advice #1: Back up important files right after the first successful reboot—recurring boot errors often foreshadow complete drive failure.
- Advice #2: Drive still invisible? Power down and call a data recovery service; repeated power-off-power-on cycles can turn a salvageable disk into a lost cause.
Your laptop powers on, but instead of Windows, you’re greeted by a blue (or black) boot error screen, indicating a boot failure on device, and the system can’t find anything to start the computer.

The wording of the error message may change from brand to brand (Dell, Lenovo, HP, Sony, Acer, etc.), but the reason is always the same—the BIOS/UEFI firmware can’t find a valid system drive (usually the internal HDD or SSD) from which to load the operating system into the computer’s RAM.
When this happens, you will see error messages such as these:
- Default Boot Device Missing or Boot Failed
- No bootable device — please restart system
- No Boot Device Found. Press any key to reboot the machine
- Boot error: Exiting Intel Boot Agent
- Boot Menu cannot be found
- No boot disk has been detected
The good news is—in most cases, you will be able to resolve this error and boot your PC again within 15 minutes!
Follow the quick-reference table below for solutions to the device not found boot error. Detailed solutions are given later.
| Fix # | Solution | Effectiveness | Difficulty | Time* |
| 1 | Check if the system drive is detected in BIOS/UEFI | ★★★ | Easy | < 5 min |
| 2 | Set the internal SSD/HDD first in the boot order | ★★★ | Easy | 5 min |
| 3 | Switch Boot Mode (Legacy ↔ UEFI) to match MBR/GPT | ★★☆ | Medium | 10 min |
| 4 | Reseat / replace SATA or NVMe cables & power | ★★☆ | Medium | 15 min |
| 5 | Run Automatic Repair from a Windows USB/DVD | ★★★ | Easy | 15 min |
| 6 | Rebuild MBR/BCD with bootrec / fixmbr /fixboot /rebuildbcd | ★★☆ | Advanced | 15 min |
*Typical hands-on time; excludes large file repairs or drive swaps.
What Causes the “Boot Device Missing” Error?
Think of the boot path as Firmware → Hardware → Operating System files. A break anywhere along that chain triggers the error messages above.
- Firmware misconfiguration: The BIOS can simply be pointing at the wrong device or using the wrong mode for the disk’s partition style. For instance, many users in the Dell community forum claim to have fixed “No Boot Device Found” by moving the HDD to the top of the list or toggling Legacy/UEFI.
- Physical drive or connection issue: A loose NVMe module, missing SSD (typically after a repair), or faulty cable means the firmware sees nothing to boot from.
- Corrupt boot records or OS files: The disk is present, but its Master Boot Record (MBR) or Boot Configuration Data is damaged, causing the boot error. Microsoft recommends running bootrec.exe or Startup Repair from Windows RE to rebuild them.
Identifying which of these three layers is broken can help save time by moving directly to the corresponding fix. However, if you are not sure, it’s better to carry out the methods given below sequentially, and you’ll have Windows loading again in short order.
How to Solve the “Boot Device Missing” Error?
Before anything else, let’s make sure your PC’s firmware (BIOS/UEFI) is looking at the right place to start Windows.
Method 1: See if your drive is “visible” in BIOS/UEFI
- Restart your PC, and as it powers up, repeatedly press F2, F10, F12, Del, or Esc (varies by brand) to enter the BIOS/UEFI setup.
Note: Search for “How to enter BIOS in {Brand Name}” in Google to find the correct key for entering BIOS/UEFI setup.
- In the main menu, look for “System Information,” “Storage,” or “Advanced”: you should see your SSD or HDD listed by name and serial number.

- Outcome:
- You see your drive → Great! Move on to solution 2.
- You don’t see it → The PC can’t “talk” to the drive at all. Save your work and skip to solution #4 (cables & connections).
Method 2: Move Your Drive to the Top of the Boot Order
- In BIOS/UEFI setup, find the “Boot” or “Startup” tab.
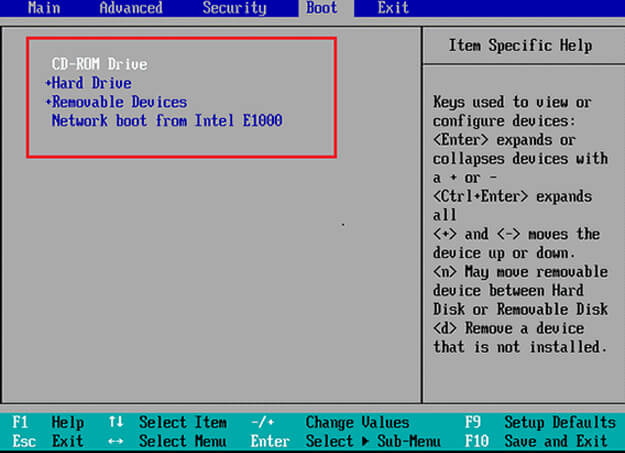
- You’ll see a list (containing, for example, “USB drive,” “Windows Boot Manager,” “Network”).
- Use the on screen keys to move “Windows Boot Manager” or your internal drive to the very top.
- Press F10 (or Save & Exit) and confirm. Your PC will restart.
Tip: If “Windows Boot Manager” isn’t an option, look for the name of your SSD/HDD instead.
Method 3: Match “Boot Mode” to your disk style
Newer PCs use UEFI with GPT disks, while older ones use Legacy/CSM with MBR disks. A mismatch means the firmware won’t hand off to Windows.
- In the same Boot tab, find “Boot Mode,” “CSM,” or “UEFI/Legacy” setting.
- Choose:
- UEFI, if your disk was set up on Windows 8 or later (GPT).
- Legacy (sometimes called CSM/BIOS), if the disk is older or you installed on Windows 7 (MBR).

- Save changes (F10) and reboot.
Note: If you’re not sure if your drive uses MBR or GPT, the safest choice on modern hardware is UEFI—but if Windows still won’t start, you may need to convert MBR to GPT or vice versa.
Method 4: Check cables & physical connections
Even perfect settings won’t help if your drive is loose or disconnected. Here’s how to safely check for loose/faulty connections.
- Shut down & unplug your PC (desktop or laptop).
- Ground yourself (touch a metal table leg) to avoid static damage.
- Open the case (remove the bottom panel on laptops, the side cover on desktops).
- Locate your drive:
- 2.5″ SSD/HDD → two cables: one slim data cable (SATA) and one wider power cable.
- M.2/NVMe SSD → a single board like module screwed into the motherboard.
- Reseat each connection:
- SATA drive: Unplug both cables, then firmly re plug until you hear a faint click.
- M.2 SSD: Remove its screw, pull out at a slight angle, then slide back in and re screw.
- Re assemble, plug back in, and power on your PC.
- Re enter BIOS/UEFI (as in solution 1) to see if the drive reappears.
Is your boot device still missing? The drive itself may be failing.
Method 5: Use Windows Installation Media to Repair
If BIOS sees your drive but Windows still won’t start because of boot failure, the built in Startup Repair and command line tools can restore the bootloader.
5.1 Make a Windows USB/DVD (if you haven’t already)
- On any working PC, download Microsoft’s Media Creation Tool.
- Run it; choose “Create installation media”
- Choose a USB drive (8 GB+) or a DVD.
- Let it finish, then plug the USB/DVD into your PC.
5.2 Run the Automatic “Repair” from the DVD/USB
- Boot from your USB/DVD: Restart and repeatedly press F12, Esc, or your PC’s Boot Menu key, then select the removable drive.
- When you see the Windows Setup screen (“Pick language...”), click Next.
- Click “Repair your computer” (bottom left).

- Choose “Troubleshoot” → “Advanced options” → “Startup Repair”

- Let it scan and apply fixes. When it finishes, restart normally—Windows should load.
Note: No need to enter Windows first; this repair runs straight from the installation media.
5.3 Advanced: Fix via Command Prompt
- Boot from the USB/DVD as above.
- Click Repair your computer → Troubleshoot → Command Prompt.

- At the prompt, type each of the following commands, pressing Enter after each:
bootrec /fixmbr
bootrec /fixboot
bootrec /scanos
bootrec /rebuildbcd
chkdsk C: /r
sfc /scannow /offbootdir=C:\ /offwindir=C:\Windows
bcdboot C:\Windows /s C:
- After all commands are processed, type exit and reboot without the USB/DVD.
What these commands do:
- /fixmbr repairs the Master Boot Record
- /fixboot writes a fresh boot sector
- /scanos & /rebuildbcd rebuild the Boot Configuration Data
- chkdsk /r checks disk health
- sfc /scannow repairs Windows files
- bcdboot restores critical boot files
If Windows still won’t start, the boot failure issue is almost certainly due to hardware.
Method 6: When the Drive Itself Is at Fault
If you’ve gone through all firmware tweaks, cable reseats, and software repairs, and the drive still vanishes or throws errors, it’s almost certainly due to a hardware issue causing a boot failure on device. At this point, expert intervention is recommended to recover your data safely.
- Mechanical wear or controller fault in HDDs, or NAND breakdown in SSDs
- Intermittent failures that pass simple tests but corrupt boot records under load
- Circuit or PCB damage (invisible without specialized lab tools)
At this point, DIY diagnostics (pulling the drive to another PC, running CHKDSK or SMART tests) can be confusing, risky, and rarely solve the core issue.
Pulling the drive out to test on another PC or running CHKDSK/SMART scans may seem logical—but it often leads to:
- False negatives or intermittent passes: A failing controller can hide faults under light testing.
- Risk of further damage: Frequent handling, wrong tools, or static discharge can worsen mechanical wear.
- Analysis paralysis: Even if you spot a SMART warning error, you won’t know the safest next step or how much data you can salvage.
Rather than taking shots in the dark, it’s smarter to get a clear, expert led diagnosis that pinpoints the root cause without jeopardizing your data.
At Stellar Data Recovery Service, our experts will confirm the problem, show you real time footage of any faults, and recommend the safest next steps to recover your data intact.
Stellar’s Precise Drive Diagnostics & Recovery
How it works:
- Free, no obligation consultation: Email us at support@stellarinfo.com with your PC/laptop model, error screenshots or short videos, and a list of the steps you’ve already tried out.
- 24×7 phone support: Call 1800 102 3232 anytime to speak directly with a recovery expert.
- Door step pickup & secure lab: We’ll collect the device from your home or office and transport it under full chain of custody to our ISO certified Class 100 cleanroom.
- Unmatched success rate: With India’s largest donor library having 15,000+ drives and decades of expertise, we can recover data even from severely damaged drives.
Ready to stop guessing and start recovering?
Email support@stellarinfo.com or call 1800 102 3232 to speak with a recovery specialist now.
Also Read: How to Fix The Error “Disk Boot Failure Insert System Disk And Press Enter"
FAQs
Boot device is the storage drive (SSD/HDD or virtual NVMe) that your firmware needs to load Windows.
This Lenovo specific BIOS message means the firmware’s auto reboot setting found no valid drive. You need to correct your boot order or switch modes.
The firmware can’t see any bootable media—check cables or run Startup Repair.
No—these tools rebuild boot records and repair system files without touching your personal files.


About The Author

Online Marketing Expert & Content Writer