To find out whether TRIM is enabled on your Mac, follow these steps:
1. Click on the Apple menu. Next, select "About This Mac."
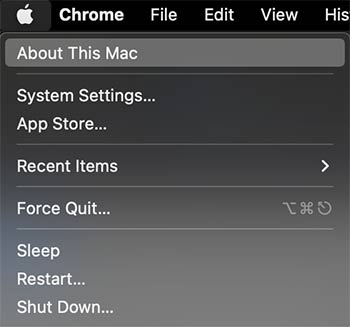
2. Go to ‘More Info’. Next, click on "System Report."
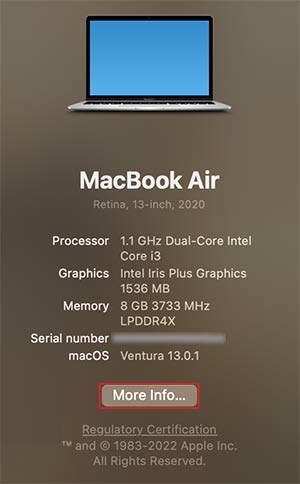

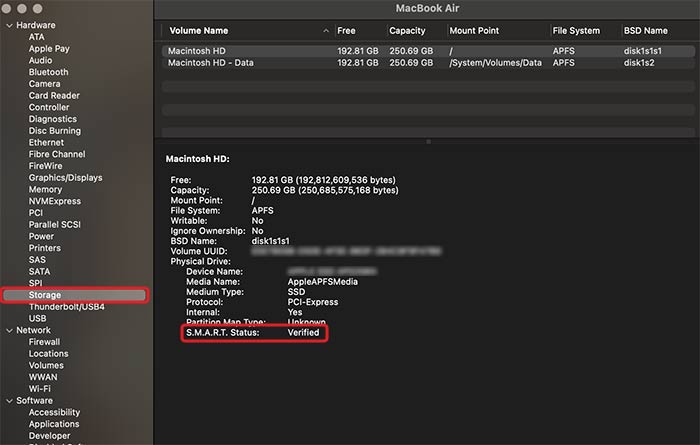
3. On the left sidebar, find and click Storage. Look for the S.M.A.R.T. Status.
In case TRIM is enabled, it may be harder to recover files on Mac.
How to Recover Files on Mac: 3 Methods?
The following three methods will give you detailed steps on how to recover lost files on Mac.
Method 1: Time Machine Backup
Here’s how to recover files on Mac using Time Machine.
1. Stop using your MacBook.
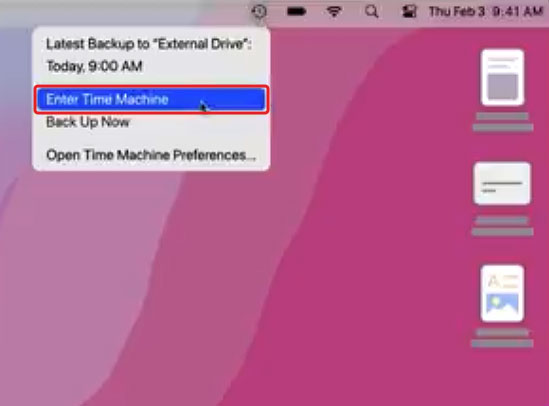
2. Click on the Time Machine icon on the left corner and select “Enter Time Machine.”
3. Go to where you last saved your item. You can also search for the item by using the search tool in the upper right corner.
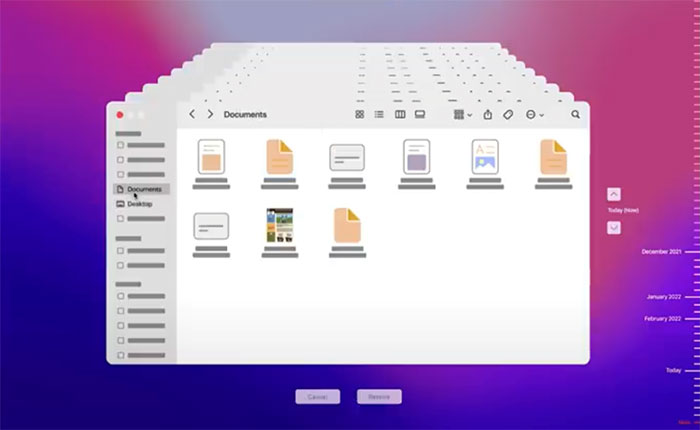
4. Select the file you have to recover. Next, click on restore.
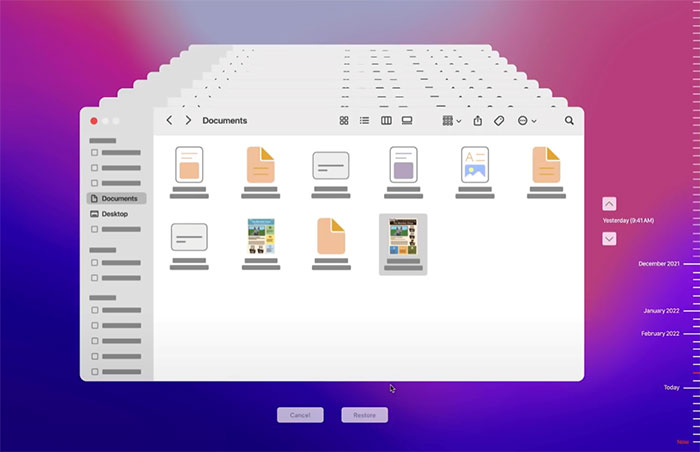
5. The item will be brought back to its original location.
Note - The above steps can be used to retrieve data from MacBook air SSD, recover data from MacBook Pro SSD.
Method 2: Download Stellar Data Recovery for Mac
Here’s how to recover files on Mac.
1. Stop using your MacBook immediately to prevent overwriting the lost data.
2. Download Stellar Data Recovery for Mac from the Stellar website.
 Free Download
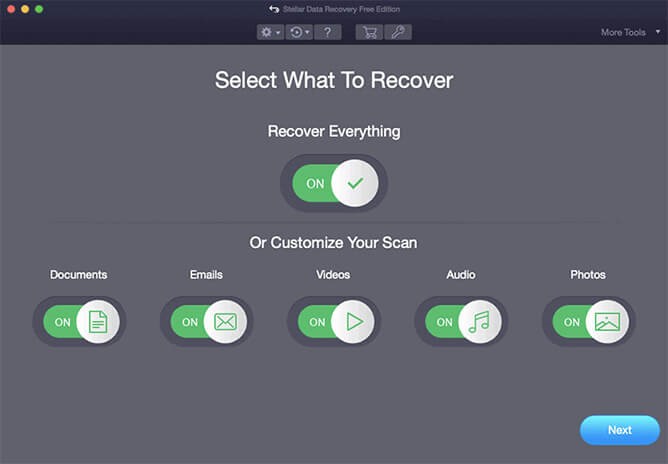
 3. Launch Stellar Data Recovery for Mac and select the file types you want to recover.
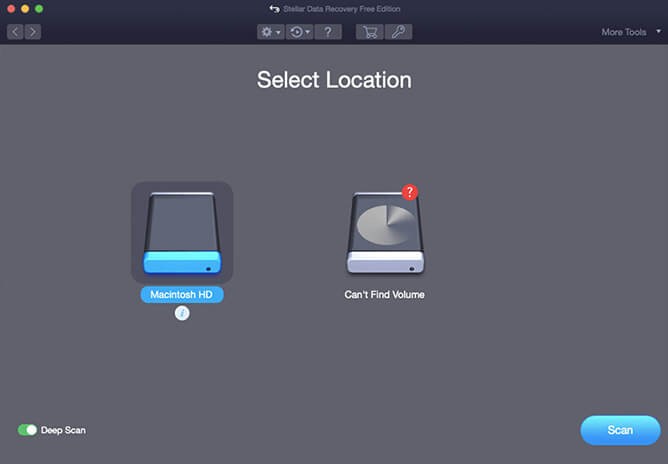
4. Select the MacBook SSD that you want to scan for lost data.
5. Click the "Scan" button. This will trigger the scanning process.
6. Preview the recoverable files and select the ones you want to recover.
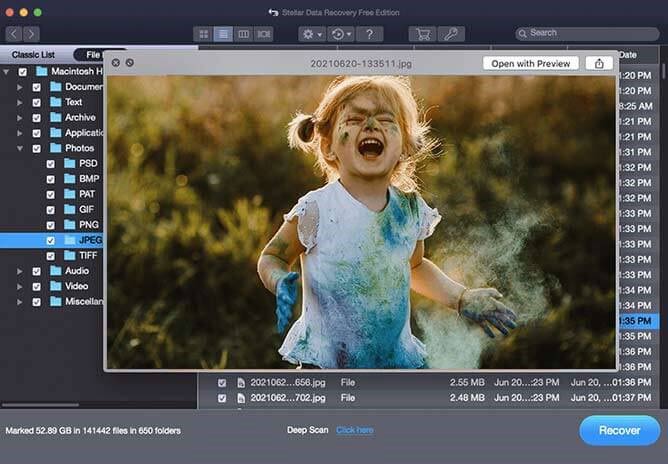
7. Click the "Recover" button to save the recovered files to a safe location.
Key benefits of Stellar Data Recovery for Mac
- Recover permanently deleted files, or files removed from Trash
- Can horoughly through formatted storage partitions on Mac to find and recover data.
- Can retrieve data from a Mac that has crashed or won't start up, without needing an external device,
- Can locate missing or hidden partition on macOS, it cand save its data
- Lets you choose specific file types (like documents, photos, etc.) to run personalized recovery procedures.
Method 3: Visit the Local Store
To recover files on Mac, the best course of action would be to send your disk to a nearby Data Recovery Service Center. Although this process might be costly, a technician might be able to save your files.
For any Mac device-related queries or professional assistance, explore our MacBook Data Recovery Services at Stellar! Whether it's a hardware failure, accidental deletion, or lost files, our experts have the tools and experience to recover your important data with precision.
If you have any more questions on ‘how to recover files on Mac’, refer to the FAQs below.
FAQ
If TRIM is enabled, recovering lost data/files on your MacBook can be a little more difficult.
- When your computer is not in use, the TRIM tool removes unnecessary data.
- If your SSD hasn't had TRIM run on it yet, there is a chance to recover your files.
- The sooner you act, the better your chances of recovery.
Try Stellar Data Recovery for Mac or consult with a professional data recovery service.
Go to the section ‘How to recover lost files on Mac’. The steps apply to all MacBook SSDs including the MacBook Air and MacBook Pro. Follow the same steps, and you should be able to recover your data.
Here are some common causes of data loss on MacBook SSDs.
- Accidentally deleting the files.
- Formatting of the drive.
- A system crash.
- Hardware failure
- Malware or virus attacks.
To check your SSD health on a MacBook, follow these simple steps:
- Click the Apple logo and select "About This Mac".
- Click "More Info" and scroll down to choose "System Report".
- On the left sidebar, click "Storage" and look for the S.M.A.R.T. Status.
- Check for the status of your SSD: "Verified" means it's healthy, "Failing" means it has a problem, and "Failed" means it's unusable.
You can use Time Machine. If you don’t have backup available, recovering your data for free can be tough. Alternatively, you use Stellar Data Recovery for Mac. We offer a free download for a trial version. You can download the free trial version to scan & preview your lost or deleted data. It supports APFS, HFS+, FAT32, NTFS and ExFAT. After you have gauged your needs, you can pick from our three pricing plans: Professional, Premium, Technician.


About The Author

Data Recovery Expert and Content Writer at Stellar Data Recovery.